Playing guitar is an undeniably difficult task to execute. Unlike the techniques of other instruments, guitar playing requires so much more than just practice. It calls for both precision and dexterity-two things that are not easily achieved.
Learning how to play the chords, scales, and chord progressions are all crucial components in mastering this instrument. Mastering the guitar basics and developing proper technique from the beginning will take you a long way towards achieving your goal to learn how to play guitar
Identify The Parts Of The Guitar
The obvious Step before purchasing or learning to play the guitar is to familiarize yourself with its anatomy and the associated basic terminology. Both electric and acoustic guitars have three basic parts – body, headstock, and neck. Each of these is further made up of a variety of components.
You strum or fingerpick the guitar strings at the body of the guitar. The tonal properties of any guitar are defined by the design of its body to a great extent. The body of an acoustic guitar is hollow and made up of a soundboard, back & sides. Electric guitars can have solid, semi-hollow, or hollow bodies.
The neck acts as the connection between the guitar body and the headstock. The fingerboard, frets, and truss rods are placed on the neck, which is designed to influence tonality and playability, resist warping, and withstand the tension of the strings.
Nut and tuning machines are mounted on the headstock which is itself located at the top of the neck.

Main Parts Of A Guitar
- The body of an acoustic guitar – Bouts & the waist, soundboard or the Top, soundhole, acoustic bridge, bridge plate & the pins, saddle, pickguard, and strap buttons.
- The body of an electric guitar – Pickup, pickup selector switch, volume and tone knobs, whammy bars.
- Guitar Neck – Neck, truss rod, fingerboard or fretboard, frets, inlays, strings, and the nut.
- Guitar Headstock – Headstock & the tuning pegs.
We have examined each of these guitar parts in detail in our article on parts of a guitar.
Buying A Guitar For Beginners
The first question that needs to be addressed before you start learning to play the guitar is the choice of type of guitar from acoustic, electric, or classical guitar. Each of these choices has its own pros and cons.
The relative advantages and disadvantages and the comparisons are detailed in our articles on Acoustic Vs Electric guitars and Classical Vs Acoustic guitars. While the final decision is usually governed by your own goals and aspirations, generally, an acoustic instrument is preferred more over others by beginners, due to its ease of use, versatility, and price range.
Some may prefer a classical guitar due to soft and thicker strings (requiring less pressure from your fingertips), lesser weight, smaller body, and wider neck.
You can get a very good beginner guitar in the $300 to #500 price range. There are even plenty of decent guitar package options in the $150 to $300 range that include essential accessories like a gig bag, and tuners in addition to the guitar.
In any case, choose a guitar that is comfortable to hold for your size. Go for a short-scale guitar if you have short arms or small hands.
How Long Does It Take To Learn Guitar
So by now, you have your first guitar and recognize all the important parts. At this stage, you should make a road map of what to learn first and how long will it take to learn? No standard method of learning how to play guitar exists and the time taken by beginner guitarists depends on several different factors. What really matters is the way you practice or what you learn. Always keep the following things in mind:
- The timelines for learning may be different for you than guitar players, depending on practice hours per week, dedication level, styles or genres, and the target level of expertise. You must customize your practice schedule to suit your goals.
- The time of your practice sessions matters a lot as the retention is maximum during the beginning and the very end of the session.
- While it is essential to know what to learn and in which sequence, it is particularly important to have an idea of how much time to spend for each phase. You can go through our guide on the average time required to reach important milestones in playing guitar.
- Develop the ability to optimize your learning by creating a great and comfortable environment, learn what you love like your favorite songs, and record your practice sessions to know your shortcomings.
- Have an effective guitar instructor.
- Set realistic short-term and long-term goals and develop a practice plan to achieve them.
How to tune your guitar
Tuning an acoustic or electric guitar can be a bit challenging for beginners, but you’ll get the hang of it once you start doing it by yourself. To simplify things, familiarise yourself with different types of electronic tuners like vibration-based, microphone, or pedal tuners. Vibration types are probably the most popular among all and work by sensing the frequency, once clipped onto the headstock.
When you are just starting, it is better to stay in the standard tuning “E A D G B E” from the low-frequency side to higher ones. It is a convention to call the thinnest string (highest pitched) the first string and the thickest string (lowest pitched) the sixth string. All of the strings are numbered 1 to 6 from the thinnest to the thickest string.

Any chromatic tuner can sense what note you are playing and indicate its sharpness, one string at a time. You can raise or lower the pitch of any string by turning its tuning peg. The tuner will light up green once you reach the correct pitch. You have to go through the same process with every string.
You can use a smartphone app for the purpose and eventually consider tuning by ear. This will do wonders for your development as a musician by inculcating the ability to play by the ear and making you aware of all the nuances in your own work. You can go through our article on ‘How to tune the guitar‘ to develop an in-depth understanding of the subject.
To improve your skills and broaden your horizon further, you may use alternate tunings like open tunings (Open E tuning) to give you creative freedom and different sounds or seven-string tuning if you are into metal or hard rock and use seven-string guitars.
Holding The Guitar Correctly
As highlighted in the section on buying the beginner guitar, the instrument you select should be comfortable to hold depending on your age, shape, and size. You should be particularly careful if you have short arms or small hands. In such cases, the short-scale guitar is more comfortable to learn on.
Players with shorter arms may find it difficult to reach the frets closer to the guitar’s neck whereas players with shorter fingers may find it difficult to fret on a full-size guitar. It will be difficult to play if your fretting hand cannot comfortably go around the neck. If you have larger hands and longer fingers, choose a thicker neck.
If you have selected an acoustic guitar, your arm must rest on the lower bout. Some new guitar players may find this uncomfortable. Some acoustic instruments come with built-in armrests.
When you are new to playing guitar, experts recommend practicing in the sitting-down position, as this makes playing a lot easier. Select the right type of chair with no arms and without a heavy cushion. Sit in a good posture with your back straight and not leaning on the back of the chair. Balance the lower bout on your thigh. It is much easier to play with a guitar strap but not absolutely necessary.
Your dominant hand must be in front of the soundhole or in the middle of the pickups, depending on the type of guitar. Your non-dominant hand will equip the neck of the instrument. Some guitar instructors recommend holding the guitar in a position where its neck is at a 45° angle to the ground, particularly for beginners as this makes fretting much easier.
Some instructors recommend holding the neck parallel to the ground. you may try both methods and ultimately select the easier one. We recommend going through our detailed article on holding the guitar correctly.
How To Hold The Pick
While a pick is a small piece of gear, it is one of the most important things for a guitar player. So you must carefully select one with the correct shape and size to suit your playing technique and genre.
Picks usually come in three sizes – thin (0.4 to 0.6 mm), medium (0.6 to 0.8 mm) and heavy (0.8 to 1.2 mm). Thin picks produce a flappier sound whereas a thicker pick will produce a clear sound with a powerful low end suitable for playing leads.
If you tend to sweat a lot, you may go for an indented or a textured grip. Also, thinner picks tend to wear out faster. If you are new to guitar playing, you can pick a sampler pack of the thin, medium, and thick picks and try them to figure out the one that suits you best.
Make yourself comfortable in a sitting or standing position with your guitar. The pick has to be pinched between your index finger and the thumb. To do this, place the pick on the curled index finger of your dominant hand with its point facing away from you your palm.
Make sure that the pick rests on the side of your index finger and not on its pad. Pick resting on the pad of the index finger will affect the accuracy and tire down your picking hand much faster. Once the pick rests properly on your index finger, bend your thumb downward to make a decent clip with your thumb pad.
Pressing too hard will make your hand tense and will increase the pick noise. The middle finger should not have any contact with the pick. The middle and ring finger should have a comfortable separation from your index finger that makes playing easier for you. Many strummers keep their fingers curled towards the palm to avoid hitting the strings and unwanted noise.
Strummers tend to keep a little more pointy end of the pick exposed, whereas the players should have a little less pick visible. This results in a cleaner sound and allows you to pick individual notes easily. You can go through our detailed guide to know more about holding the pick.
Learn Basic Guitar Chords
One of the most exciting elements in learning how to play guitar is the guitar chords. They can really add life to your playing. All your favorite songs are made up of a few basic chords.
To form a chord, you have to strum at least two notes together, to create a harmonious sound. Most chords contain three or four notes, and certain genres of music like jazz have chords with even five or six notes. Chords are divided into two basic types – The first position chords and the barre chords (or bar chords).
The first position chords are a combination of open strings and pressed strings in the first three frets. In Western music, the primary chords are the major triads and the minor triads, also known as the major chords and the minor chords. These triads are built on a specific degree of major and minor scales.
A major chord has a natural third, that’s the third degree of the chord’s respective major scale. Whereas the minor chord has a minor or a flat third, which is the third degree of the chord’s respective minor scale. All major chords are referred to by their letter name. So, a G chord is denoted as “G“. Any minor chord has a small “m” after its letter name. For example, E minor chord is denoted as “Em“.
All major chords produce a bright and happy sound while all minor chords have a dark, sad, moody, and mournful sound associated with them.
Some of the most memorable songs use some combination of the following, easy to play open chords – C chord, D chord, G chord, and an E minor chord. Read our article on Open Chords to have an in-depth understanding of these.
Learn Finger Placement For Chords
One of the most common methods for you to learn to play chords and remember them is by using chord charts. This chart visually depicts a fretboard with circles used to show you where to place the fingers of your left hand on the fretboard for playing any one chord. The X’s on the chord diagrams represent the muted strings or the strings that you will not strum, while the O’s denote an open string that you will not fret.
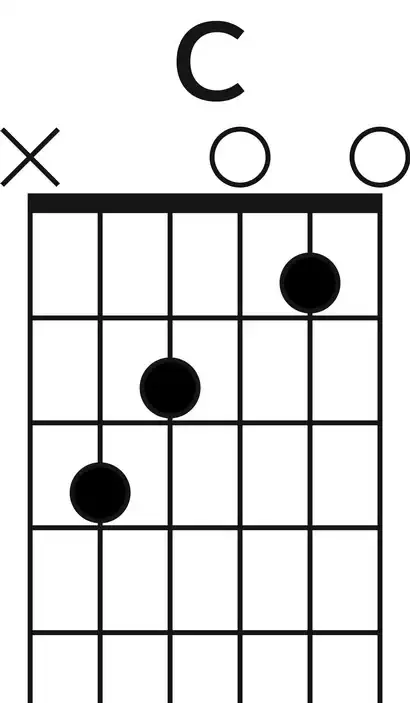
You can quickly learn how to play the C chord by using the chord chart shown below.
Many instructors want their students to start playing chords with C major as their first chords as so many songs have been written in the key of C major.
To Play The C Major Chord
- Place your index finger at the first fret of the second string (B), your middle finger at the second fret of the fourth string (D), and your ring finger at the third fret of the fifth string (A ).
- Notice ‘X‘ above the sixth string (low E) on the chord diagram, which indicates that you don’t play the lowest E string when you strum the chord.
- Note ‘O’ above the first and the third string, which means that you do not fret the strings while playing the particular chord.
You can use the chord diagrams as explained above to practice other important chords. After placing your fingers on the fretboard, play each of the strings forming the chord.
If any of the string is muted or gives a muffled sound, chances are that either some part of your finger or unused fingers are touching the string or you are not pressing the string hard enough. Your fingers must be curled about the fretboard to leave enough space for open strings to ring out.
Learn Chord Progressions
When you play a series of two chords or more in succession in a specific sequence based on the scale, it is known as a chord progression. You can consider any chord progression to be like a sentence formed from individual words (chords).
Fully grasping how these progressions work, can help you immensely if you are a rhythm guitarist or interested in songwriting, it allows you to transpose them at will and makes improvising any solo a whole lot easier.
Chord Progressions are denoted in Roman numerals using the Nashville numbering system. In this system, I, IV, and V are a progression with (I) as the first note or the root, IV as the fourth note, and V as the fifth note on the scale. Each such progression can be played in any key and thus forms a template that is used over and over with different keys and notes.
In our article on the guitar chord progressions, you will learn about common progressions like I IV V progression (12 Bar Blues), I V vi IV (The Pop Punk ), I vi IV V (50’s progression), vi IV I V (The Sensitive Female Chord Progression), ii V I (The Basic Jazz Progression), I VI ii V (Another Jazz Standard Progression). As in any chord, lowercase indicates a minor chord.
Learn Barre Chords
Once you’re comfortable with playing chords and feel you are ready to play your first song, there are still a few steps before you can do so. The first of them is learning guitar barre chords also known as the movable chords. They can be a real stumbling block in your progression to the intermediate level. It is very important to build the required strength in your hand by regularly practicing daily to overcome the challenges posed by them.
F barre chord (or bar chord) is the barre chord in the first position and is played by placing your index finger at the first fret across the entire fretboard. Thus, the first finger is barring all the notes of a single fret. Place your middle finger at the second fret of the third string (G), your ring finger on the third fret of the fifth string (A), and your pinky on the third fret of the fourth string (D).
While these are difficult positions to learn, you can easily start playing chords for any pop or rock song once you’re comfortable with them.
Jimi Hendrix and John Frusciante wrapped their arms around the neck to play the low E string. This gave them more freedom with their other fingers. Others feel this particular technique to be confining as it requires bigger hands and twisting of the wrist, which may be uncomfortable.
You can read our article on different types of barre chords along with great tips on how to develop your technique and strength to play them.
Learn basic guitar strumming
In the previous sections, we are already learned how to hold the guitar and the pick. Now, you will get to know the movement used in strumming. It is very important to stay relaxed without any tension in your shoulder, elbow, or your wrist. You must move your hand from your wrist rather than the elbow.
If you prefer to use a pick, the two important considerations are your grip and the angle between the pick and the strings. The grip should not be too loose or too tight. As far as the angle is concerned, some experts recommend keeping the tip of the guitar pick at an angle of 10° to 30° from the string.
Many players prefer strumming without a pick. The sound in this case is a bit quieter but allows you to switch to fingerpicking if required. Use the first finger or your thumb for strumming. The first finger is good for slow and quiet strumming that isn’t very vigorous.
The thumb on the other hand gives rise to an interesting sound. In the downward stroke, use the pad of your thumb and in the upward stroke, use your nails. Notes played with this technique will give you a quieter sound in the downstrokes, and a sharper sound in the upstrokes, similar to the picks.
However, the most common method is probably holding your first finger and thumb together to imitate holding a pick. In this technique, your fingers will strike the strings on the downstroke and your thumb on the upstroke.
Like most new guitar players, you may be raring to try complex and beautiful rhythm patterns. But, you have to master a simple strumming pattern of upstrokes and downstrokes, given in our detailed article on how to strum a guitar, to get there.
Learn to play basic guitar scales
Knowing the concept behind guitar scales helps you to develop a better understanding of your guitar and improves you as a player. But, looking at the guitar scales diagram can be intimidating for many beginners. You have to break down the scale into smaller boxes or parts and master one box at a time. On careful observation, you will find a lot of repetition among them, with further helps you to learn quickly.
Eventually, you have to learn to use guitar scales to improvise. It is better to practice with someone or at least use a backing track. As an example, if you are using a backing track that is in the key of C major, you can use the C major scale or A minor pentatonic scale (relative minor of C) to improvise.
Scales are used to define chords, compose melodies and create harmonies. Chords form the harmonic structure of any song. Melodies consist of single-note lines played over the chords. Harmonies occur when you play more than one single note line together.
Our helpful guide and introduction to guitar scales will be of great help to beginners. The main guitar scales to learn are
- The Minor Pentatonic Scale
- The Chromatic Scale
- The Blues Scale
- The Major Pentatonic Scale
- The Major Scale (The Ionian Mode)
- The Mixolydian Mode
- The Natural Minor Scale (The Aeolian Mode)
- The melodic minor scale
Pentatonic scales are basically 5 note scales. Like chords, the words ‘minor’ and ‘major’ refer to the mood of the scale, like sad, dark, happy, bright, etc.
Practice Schedules and Routines
The only way you can get really become a better guitar player is by creating your practice routine & schedule and sticking to it. But, this is where most aspirants fail. Practicing can make it easier to learn and with our tips in the article on how to practice the guitar, which I will summarize below, you will be playing in no time!
- Be realistic about your practice schedule and the time you can commit to playing guitar daily and weekly.
- If you are just starting, allocate more time to focus on acquiring the basic skills. Slowly, move towards the techniques that support your ultimate goals taking the genre you want to master into account.
- Practice will purpose – Every part of your routine must improve you as a guitarist. Allocating some time to learn difficult and challenging things is a must.
- Include music theory in your routine on a regular basis and learn to apply it directly to your playing.
- It is essential to develop some basic proficiency in scales and chords. It is a good idea to start with a scale. Usually, a minor pentatonic scale is a great choice for beginners. Apart from individual chords, learning how to structure a chord progression is a very important skill.
- Do not try to do everything at once.
Our Other Related detailed Articles
Other Guitar Songs Related Articles
Rock Songs | Country Songs | Beatles Songs | Bass Songs | Love Songs | Christmas Songs | Classical Guitar Songs | Power Chord Songs | Fingerpicking Songs | Worship Songs | 70s Songs | 80s Songs | 90s Songs | Love Songs for Him | Saddest Songs | Van Halen Songs | Funeral Songs | Missing Someone | Wedding Songs | Heartbreak Songs