If you've been playing guitar for a little while, you probably have learned several open chords. But if you want to develop as a guitarist and start getting a better idea of music theory, too, learning barre chords (also spelled as "bar chords") is the next logical step. Though nearly everyone is apprehensive about learning them at first, they are well worth the effort! In this list, we'll take you through the main types of barre chords and offer some advice for learning and practicing them.
Barre Chords: the Complete Guide
Learning to play bar chords might seem overwhelming. But with some guidance, it's not so bad. Here are the main eight shapes you need to know, along with some practice tips to help you succeed!
1. What's The Point?
The concept behind bar chords is a simple one. A bar chord requires you to use a single finger (usually your index finger) to fret multiple strings at once. This index-finger bar works a lot like a capo; pressing all strings across one fret (whether with a finger or a capo) lets you use simplified chord shapes behind that bar.
But why learn to play bar guitar chords, anyway? Being able to use the same shape to play different chords is a major advantage when it comes to guitar playing. For one, you don't need to memorize seemingly endless chord shapes like you do when learning open chords. When you know your bar chord shapes, you can often figure out how to play a chord if you don't know the exact fingering for it.
For example, let's say you need to play a G minor. To play it as a barre chord, you would just need to find a root note and know your minor chord shape for that root note.
Though it's certainly worthwhile, learning to shape bar chords does take some time and effort. On open chords, your open strings ring out freely. But since there are no open strings with bar chords, you'll need to make sure that each note can ring without any muting or buzzes. We'll go over some tips for learning how to do this later on.
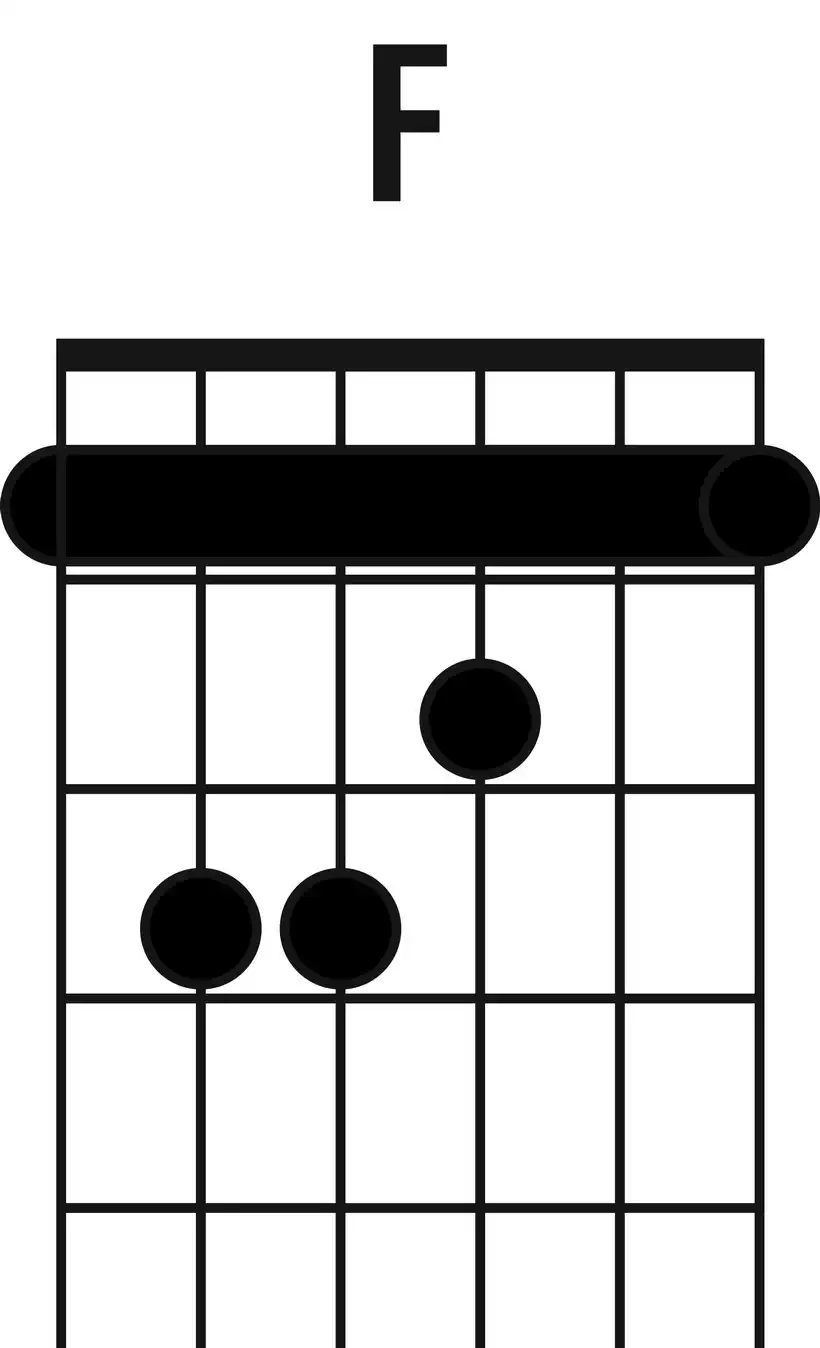
You may have begun taking steps toward fully shaped bar chords without even knowing it. Many beginners learn an abbreviated F major. It's the first chord on this chart:
As you can see, this simplified shape asks you to use your index finger to bar the first and second strings. If you haven't yet learned this simplified F chord, you might want to practice it before playing a full barre.
In a moment, we'll start talking about root 6 major bar chords, one of which is F major. Once you've gotten comfortable with the major shape for root 6 chords, you may find the full-bar F major chord is actually the easier of the two!
2. Root 6 Chords: Major Chords
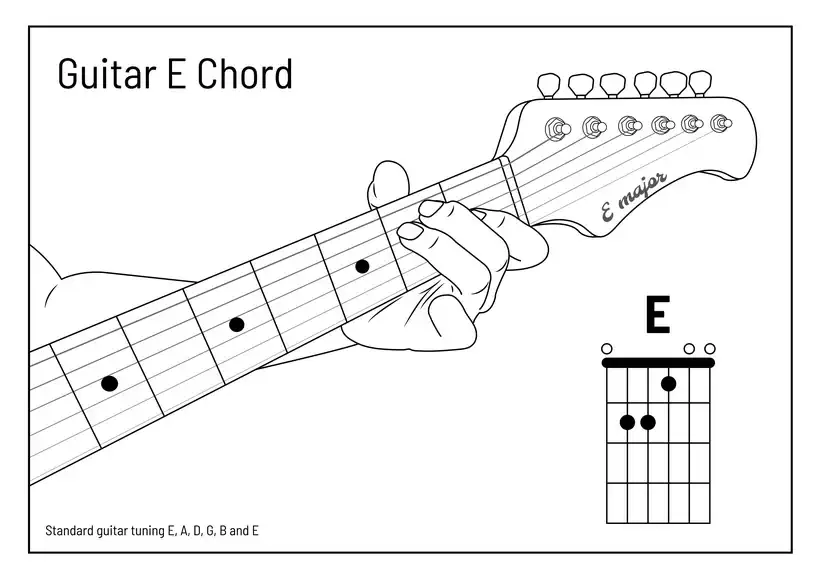
The root 6 chord is usually the first major barre chord shape you'll learn. The "root 6" name references the fact that the root note is on the sixth string (low E string). You will need to be familiar with the same E chord shape you would use for an E major in the open position. Here it is:
For this shape, you will need to bar all six strings in front of the E major chord shape. You will effectively pinch the guitar's neck between your thumb and the rest of your hand, similar to the way you'd hold a cheeseburger. When fretting a barre chord, make sure your thumb is at the middle point of the neck or lower. If your thumb is too high, you might not be able to get a powerful enough bar to let each string ring out freely. For some tips on barre chord technique, check out this helpful video.
To play root 6 bar chords, you will need to find the root note of the chord you want to play. We'll use F major as an example. The root note of this chord is F. And on the low E string, you get an F on the first fret, so we barre all strings on the first fret with the index finger.
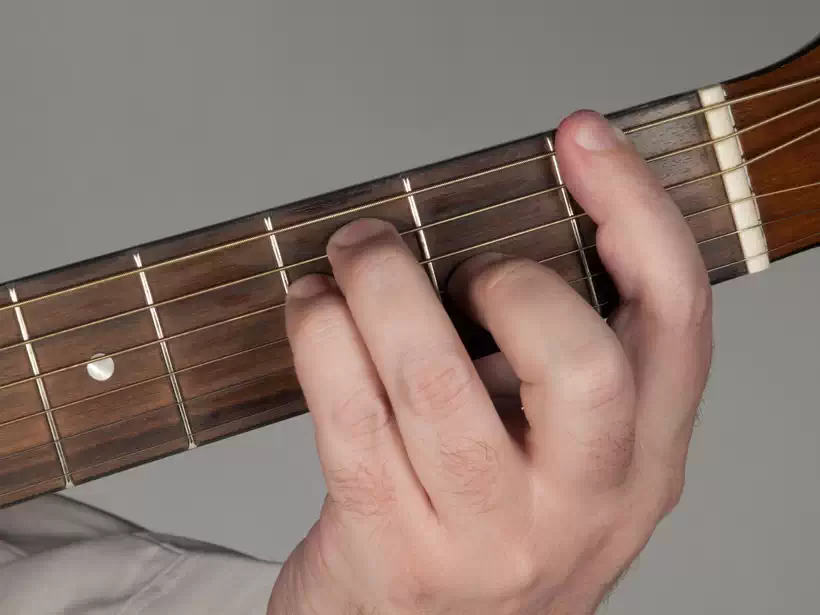
Next, we will need to make an E major chord shape behind the bar. Place your middle finger on the third string at the second fret. Then, place your ring finger on the fifth string at the third fret and your pinky finger on the fourth string at the third fret.
Here's what it looks like:
To get any major chord, you just need to move this exact shape to different frets. The F major barre chord has its root note on a first fret barre, while a G chord has its root on the third fret, etc.
Remember that these different chords are on different places on the neck, but they all use the same shape. Here's what fret to move your barre to in order to get different chords:
3. Root 6 Chords: Dominant Sevenths
As you may have guessed, dominant seventh shapes are based on the major shape. You will still use your index finger to bar across the strings.
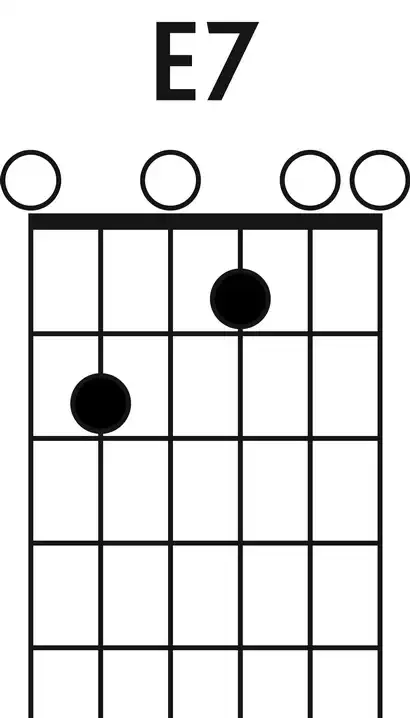
But instead of using the shape of an open E major chord, you will need the shape of an E7 chord. To make an E7 chord, you just form an E major without your ring finger.
***Please note that dominant seventh chords are NOT the same as major seventh chords. This helpful video will explain the difference between the two.
For an example of a dominant seventh bar chord, let's stick with our F major example. You'll need to bar all strings at the first fret as you would with an F major chord. Place your middle finger on the third string at the second fret and your ring finger on the fifth string at the third fret. Here it is:
4. Root 6 Chords: Minor Chords
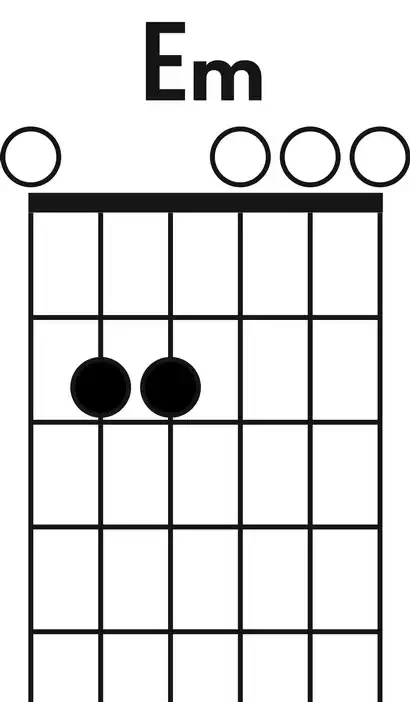
Just as you use the shape of an open E chord for F major and other root 6 chords, minor bar chords involve the shape of an open E minor. Here's the open E minor:
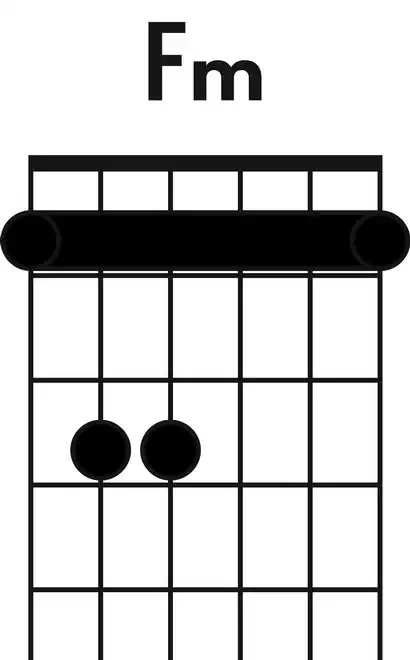
The barred versions of root 6 minor chords just require you to lift your middle finger off of the third string. So for a root 6 F minor, you would use your index finger to bar all strings at the first fret.
You'd then put your ring finger on the fifth string at the third fret and your pinky on the fourth string at the third fret. Here's what it looks like:
For a more thorough introduction to root 6 minor chords, check out this video.
5. Root 6 Chords: Minor Sevenths
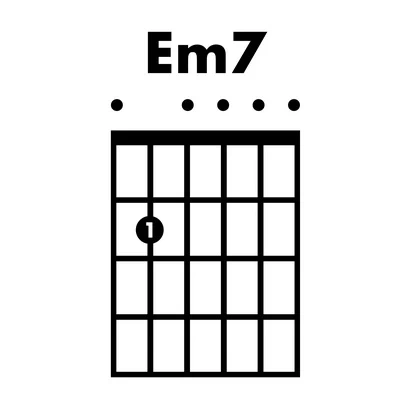
Unsurprisingly, the root 6 minor seventh barre chord shapes are based around the E minor seventh chord shape. The Em7 chord is pretty simple:
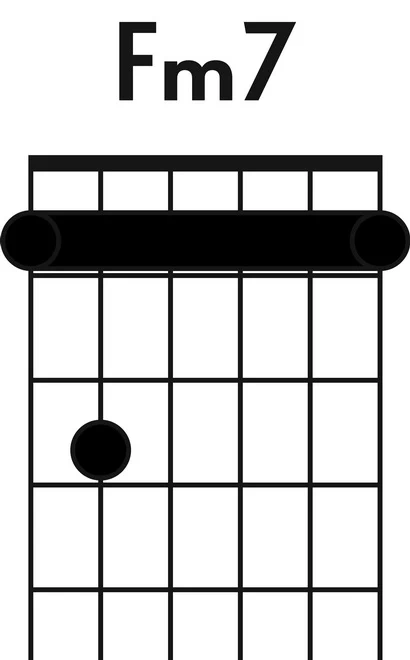
The barred versions of root 6 minor seventh chords are just like root 6 minor chords, but you remove your pinky. To play an Fm7, you bar all strings across the first fret and place your ring finger on the fifth string at the third fret:
Here's where to move the root 6 minor seventh shape to get different chords:
To check out some root 6 minor seventh chords, check out this great video!
6. Root 5 Chords: Major Chords
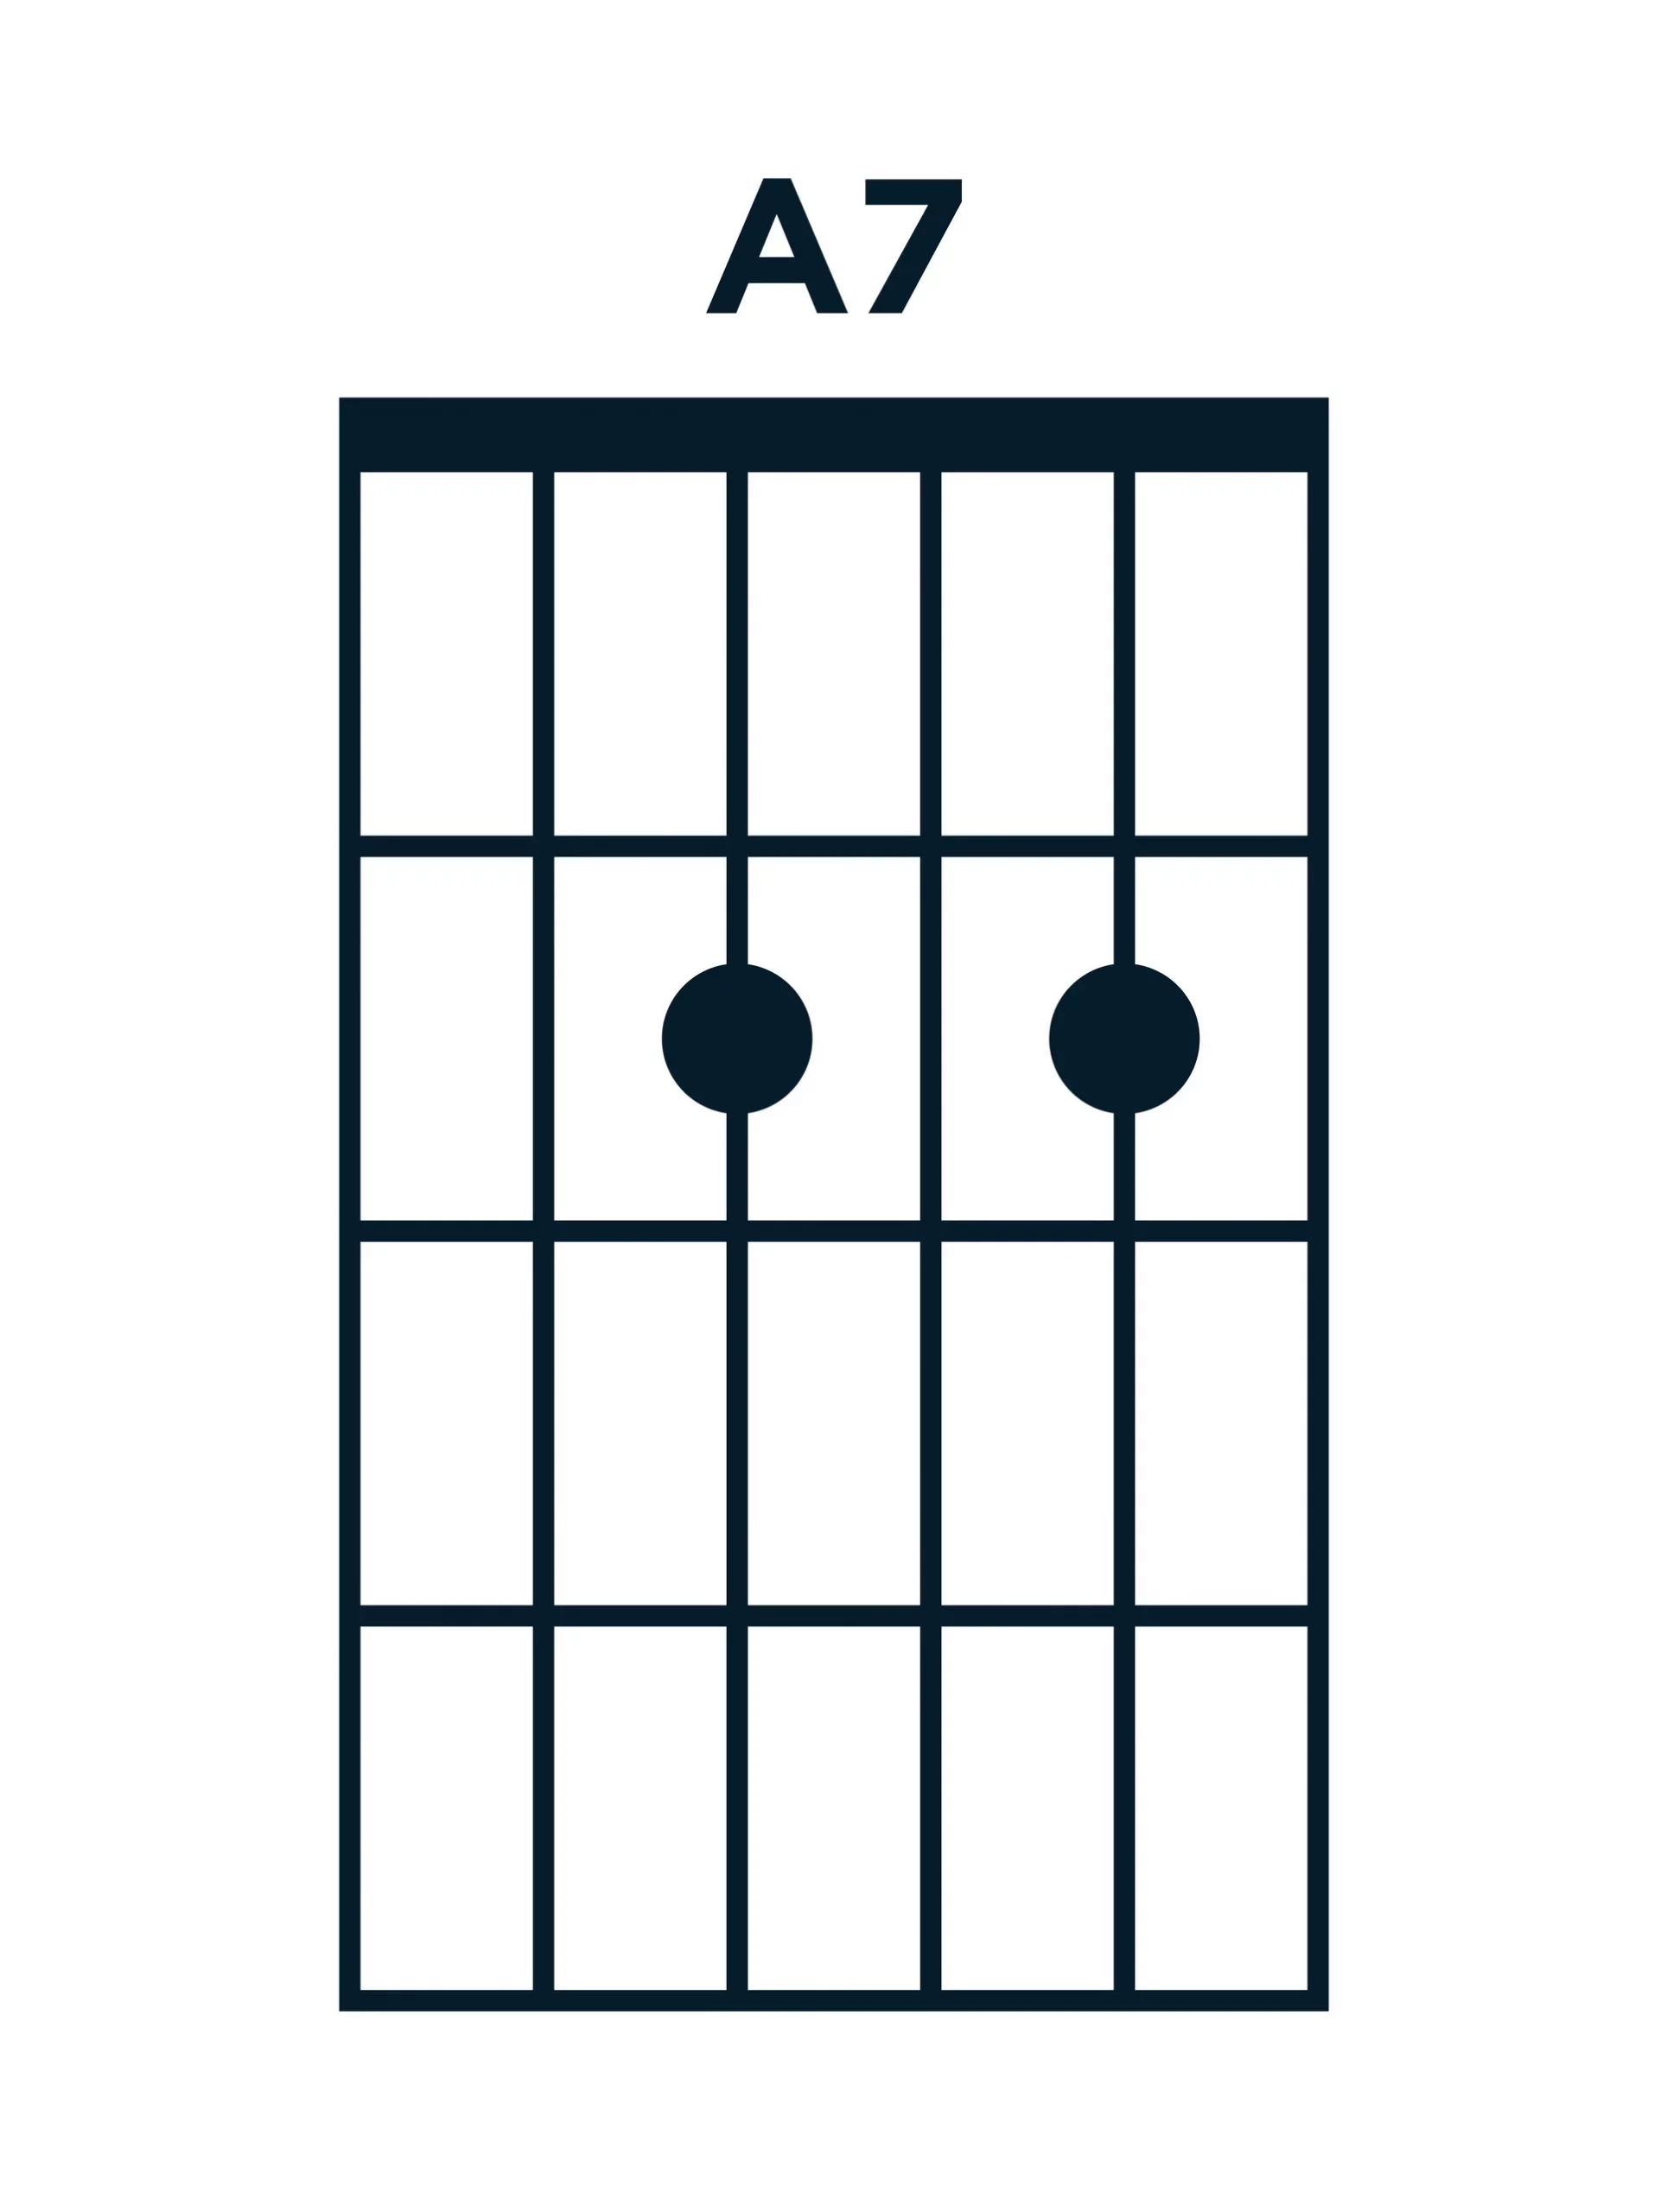
The root 6 position isn't the only major barre chord shape you'll need. "Root 5" chords are so named because the root note is on the fifth string (instead of on the sixth string or low E string). But unlike root 6 chords that use the shapes of E chords, root 5 chords require you to use the open A chord shape.
The diagram for an A major chord is below:
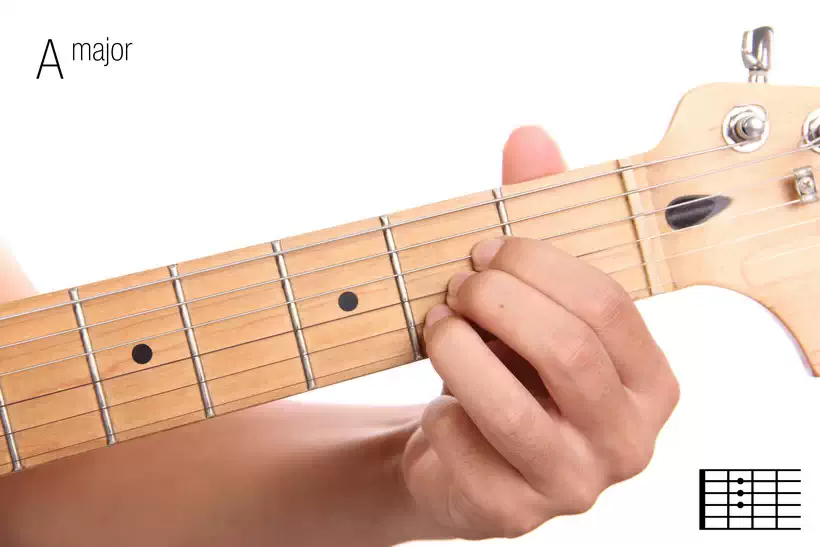
You may find this barre chord shape slightly easier, as you don't need to bar all six strings. However, having your middle, ring, and pinky fingers all on the same fret can be a challenge, especially if you have larger fingers. Some players prefer a double barre, where you use another finger to bar multiple strings behind your index finger bar.
For root 5 chords, you use your index finger to bar strings 1-5. You also will need to avoid playing the low E string -- if you do, the chord will sound discordant. Some players opt to use the top of the index finger to lightly touch and mute the sixth string. Others just make sure they don't strike it while playing.
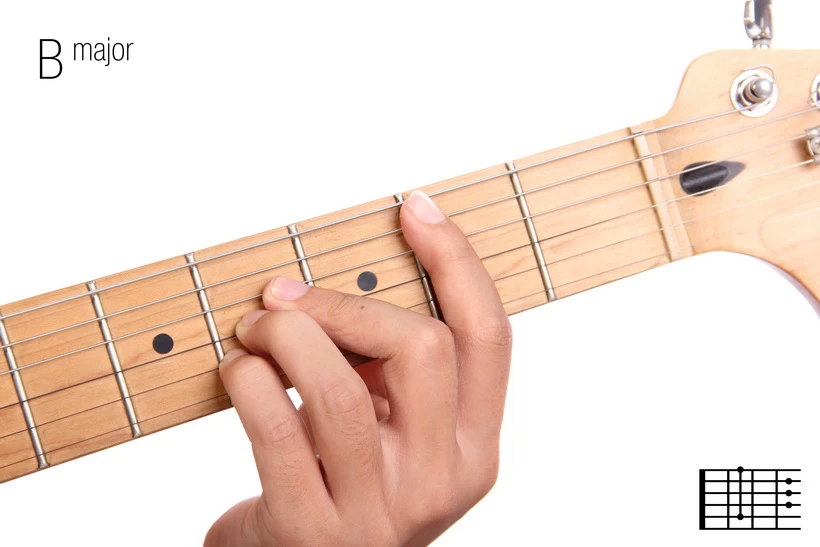
Let's take a look at how to play a root 5 B major chord. Your root note, B, is on the fifth string at the second fret, so barre strings 1-5 at the second fret. On the fourth fret, use your middle, ring, and pinky fingers to fret the fourth, third, and second strings respectively. It should look like this:
As you can see, your first finger on the fifth string plays the root note. Here's a list of the different root 5 major chords you can play up to the twelfth fret:
This video takes you through many of the root 5 major chords you need to know.
You likely noticed that you can play the same chords as either root 5 or root 6 barre chords. How you play them is up to you. But if you're going for a richer sound close to that of an open chord, it's a good idea to pick the fingering closest to the headstock.
7. Root 5 Chords: Dominant Sevenths
Barre chord shapes for root 5 dominant sevenths are based on the open A dominant seventh chord:
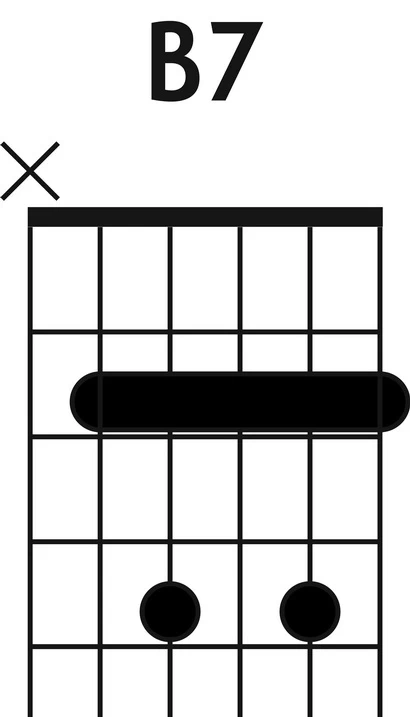
Let's take a look at how to play a root 5 B7 chord. Playing B7 is the same as playing B, but you lift up your ring finger. Barre strings 1-5 at the second fret. Place your middle finger on the fourth string at the fourth fret and your pinky on the second string at the fourth fret, like this:
Here's where to move this root 5 dominant seventh shape to get different chords:
To learn how to play these chords, check out this video.
8. Root 5 Chords: Minor Chords
https://stock.adobe.com/images/c-minor-guitar-chord-tutorial/98163782?prev_url=detail
As you've been learning to shape bar chords, you're probably getting the hang of what open chord shapes each barre chord type is based around. So you likely already know that because you use the open A major shape to play a root 5 major chord, you use the open A minor shape to play a root 5 minor chord. Here's an open A minor:
https://stock.adobe.com/images/guitar-chord-diagram-to-add-to-your-projects-a-minor-chord/95355818?prev_url=detail
To play a B minor barre chord, you would move your root 5 barre to the second fret, where the root note is B. You would then form the same shape as an open A minor behind that bar. Have your middle finger on the second string at the third fret, your ring finger on the fourth string at the fourth fret, and your pinky on the third string at the fourth fret. Here's what it looks like:
https://stock.adobe.com/images/bm-basic-guitar-chord-chart-icon-vector-template/319510135?prev_url=detail
Here's where to move the root 5 minor shape to get different chords:
- Open: Am
- 1st fret: A#m
- 2nd fret: Bm
- 3rd fret: Cm
- 4th fret: C#m
- 5th fret: Dm
- 6th fret: D#m
- 7th fret: Em
- 8th fret: Fm
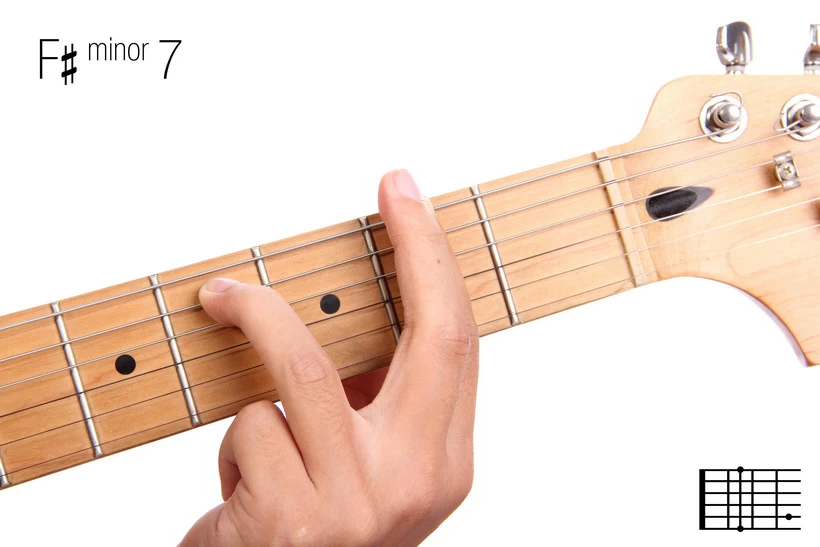
- 9th fret: F#m
- 10th fret: Gm
- 11th fret: G#m
- 12th fret: Am
For some help learning to play root 5 minor chords, check out this informative video!
9. Root 5 Chords: Minor Sevenths
https://stock.adobe.com/images/bm7-basic-guitar-chord-chart-icon-vector-template/319510164?prev_url=detail
Root 5 minor seventh chords are based on the shape of an open Am7 chord. The open Am7 looks like this:
https://stock.adobe.com/images/am7-chord-a-minor-7-open-chord-for-beginners-vector/254009528?prev_url=detail
Let's take a look at how to play a root 5 Bm7 chord. Just like with a Bm chord, bar strings 1-5 at the second fret. Place your middle finger on the second string on the third fret. Then place your ring finger on the fourth string at the fourth fret. It's just like playing a B minor chord -- you just need to lift up your pinky.
As with other root 5 and root 6 barre shapes, you can move a root 5 minor seventh chord to different frets to play different chords. Here's where to move your barre to play each chord:
- Open: Am7
- 1st fret: A#m7
- 2nd fret: Bm7
- 3rd fret: Cm7
- 4th fret: C#m7
- 5th fret: Dm7
- 6th fret: D#m7
- 7th fret: Em7
- 8th fret: Fm7
- 9th fret: F#m7
- 10th fret: Gm7
- 11th fret: G#m7
- 12th fret: Am7
For some more information and advice on minor seventh chords, check out this helpful video!
10. Barre Chord Practice Tips: Technique
Knowing the theory behind playing bar chords is one thing. But how do you get good at playing them? Just like with playing scales and solos, you'll want to perfect your technique first.
Even before you start practicing barre chords, make sure you can bar all the strings (using a single finger) across the guitar neck without buzzing or muting. You should hear a clean sound every time, with all the notes ringing clearly.
Getting this sound is often harder than it seems. With your one-finger bar, practice applying just enough pressure to get a clean sound. It usually takes less pressure than you might think. Plenty of newer guitarists start out by applying excess force that tires your hand without improving your sound.
If you notice a lot of muting, your barring finger may be too close to the fret. Experiment with moving your finger both closer to the fret and further away. Then see which position gives you the best sound.
Buzzing and muting happen frequently in the middle strings. This often occurs near the finger joints. To help stop this from happening, focus on pushing your index both down and toward the headstock (as opposed to just down). This motion helps to partially roll your finger forward, applying more even pressure on the strings. For some more technique advice, check out this helpful video.
You may find that as you practice, your technique suffers as your hand fatigues. That brings us to our next section -- how to build hand strength.
11. Barre Chord Practice Tips: Hand Strength
The technique tips above should help you get more comfortable playing bar chords. But if you find yourself running into buzzes and/or string muting as you practice bar chords, building hand strength is a must.
Good hand strength will help you get a clean sound. But for many beginner guitarists, it takes some time to build. One of the most straightforward ways to do so is gradually increasing your practice time. You might practice barre chords 10 minutes a day at first and then build up to 15 minutes per day the next week.
There's also a quick hand strength workout that can help. Start with both hands open. Then curl them into fists and back open. Do this repeatedly and as quickly as you can. Once you can do 200 repetitions without stopping, you'll know your hand strength has really improved!
It's worth noting that it's easier to play bar chords on electric guitars than it is on acoustics. Generally, the thicker the guitar neck, the harder it is to get a full barre. On a traditional classical guitar with a very thick neck, barre chord shapes can be especially hard to get right.
If you find yourself dealing with excessive hand fatigue, you may need to adjust the action on your guitar. If your strings are too far above the fretboard, you'll need to apply extra force to fret them. This can cause discomfort and even hand injuries.
You can adjust your guitar's action yourself, but you may also want to find a competent guitar tech to do it for you. Here's a video on action adjustment if you want to adjust it yourself!
Want to Learn Even More?
Learning to barre multiple strings is an impressive accomplishment in your journey to learn how to play guitar. But if you'd like some extra guidance on how to master your first barre chords or simply on what to learn next, checking out an online learning program for guitar playing is a great step to take. An online course can offer you the same structure as you'd get with in-person lessons, but it's a fraction of the cost. Plus, there's a course for just about any genre you can imagine!
Final Thoughts
Learning to master barre chords is certainly a challenge. But once you get the hang of playing important bar chords, you aren't likely to forget how! But what do you think? Did we leave out any key tips for playing bar chord shapes? Let us know in the comments, and please don't forget to like and share if you found the list useful!


