The CAGED System is a method that will help you unlock the fretboard and understand how guitar chords, scales arpeggios are logically laid out on it for easier recognition. You’ll be able to see chord shapes all over the neck, and you’ll know where each chord can be played. This system is based on 5 basic open chord shapes that are movable up and down the fretboard.
Once you have learned these chords, you can play any song you come across. These chords form the basis for most popular songs that are written for guitar. With a little practice, you can apply this system to your own playing style and start creating your own music.
Read through the complete article today to understand all the basics of the CAGED system and apply them to your playing.
What is the CAGED System for Guitar?
On piano, the linear layout and two colored keys allow you to visualize the notes, intervals, and chords easily. Memorizing notes on the fretboard is itself a big challenge for most beginners. Next, you need a system to recognize the chord shapes and scale patterns easily. Thankfully, the CAGED system provides that.
The genesis of the CAGED is based on recognizing that while you play many major chords on the guitar fretboard, you can use only five major chord shapes to play them all. These shapes are derived from the five open-position chords C, A, G, E, and D, collectively known as the CAGED chords, hence the system’s name.
The CAGED system works by memorizing the fingering positions for these basic chord shapes and applying them to play all the other chords. The system is equally applicable to scales & arpeggios over the entire fretboard.
In addition, this system applies to all styles of music and to rhythm & lead guitar. You can use it on both acoustic and electric guitars. It allows you to improve your guitar playing by providing the flexibility to play any major chord higher up the fretboard instead of being limited to the open shapes.
How the Guitar CAGED System Works
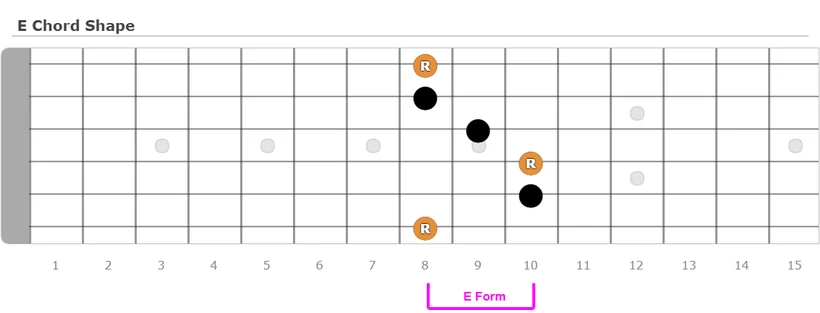
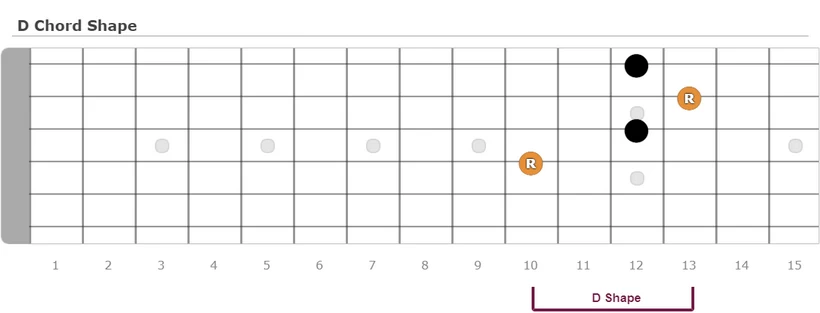
To understand the system’s functioning, you must first be clear about the concept of a chord shape, also known as chord form. It is the arrangement of your fingers on the fretboard matching one of these open major chords. So you have five open chord shapes to perfect to play all major chords. You can use any one of these major chord forms to play every major chord by simply moving the shape up and down the neck using a capo or bar.
While E and A shapes are easy to play with and move around, other shapes (C, G, and D) are physically challenging in barred positions and require practice and effort to be comfortable with.
CAGED Open Chord Shapes
As stated above, the CAGED system is based on the following major chord shapes. The open positions of these chords are shown in the individual chord diagram below.
- C Shape
- A Shape
- G Shape
- E Shape
- D Shape
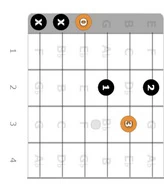
The fingerings of each of these open chords are also indicated, with 1 for the index finger, 2 for the middle finger, 3 for the ring finger, and 4 for the small finger.
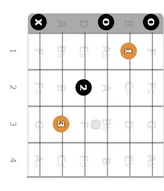
C Major Chord Shape
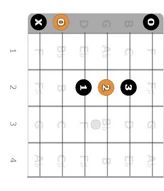
A Major Chord Shape
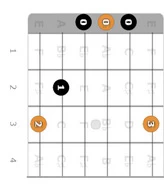
G Major Chord Shape
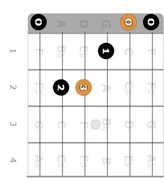
E Major Chord Shape
D Major Chord Shape
Requirements to Use the CAGED system
For using the CAGED system effectively, you must take care of the following three important things.
- You must be comfortable playing these common open chords. Else spend some time practicing them.
- You must know and remember the location of the root note within the chord shape. Take a few moments and study the diagrams given above thoroughly.
- You must have a basic knowledge of barre chords and be able to use them. You must use your index finger as a capo to bar across the fretboard, building the required chord shape with your remaining fingers. You can transform each of the above open-caged chord forms into a barre chord and move it around the guitar neck.
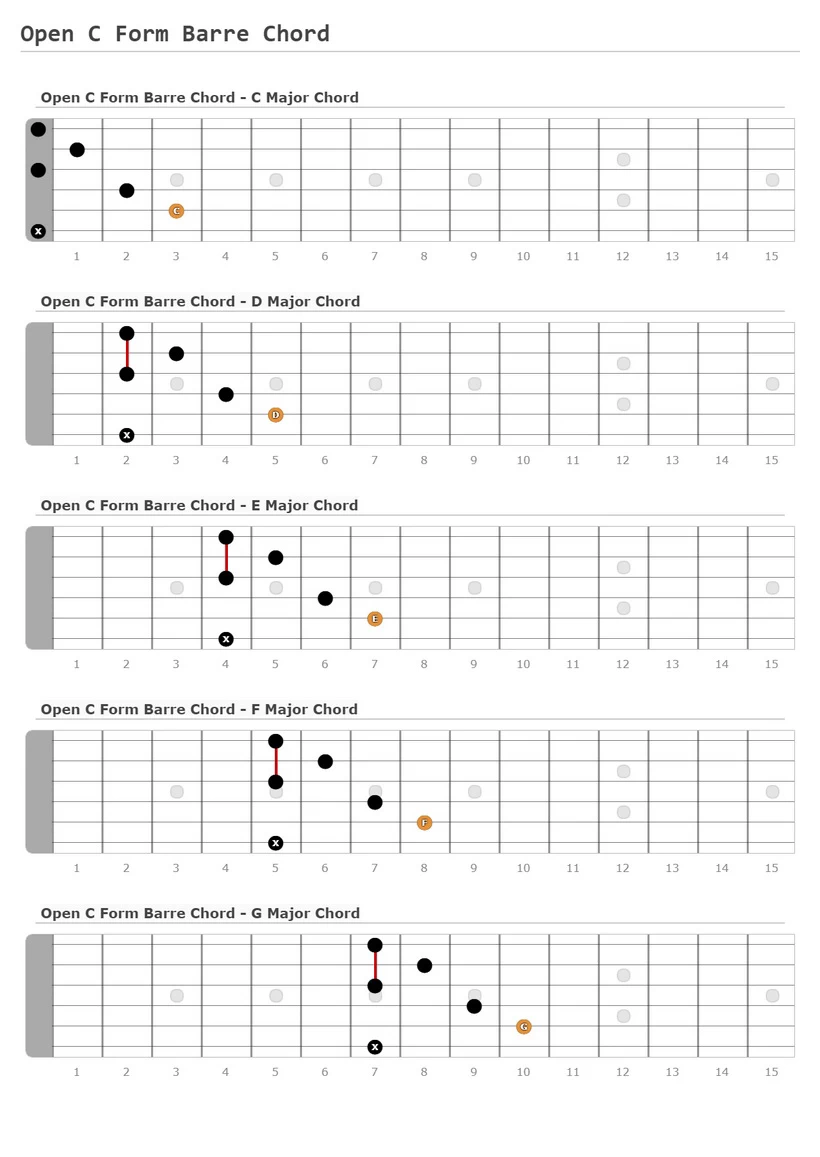
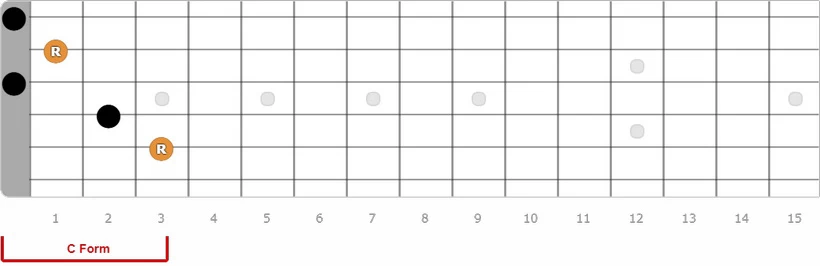
C Form Barre Chords
Let us illustrate the entire concept you have been introduced to using the diagrams below, wherein the open C chord is transformed into a movable C-shaped barre record. The root note for this shape in an open position lies on the 3rd fret – 5th string. The 6th string is skipped or muted. The 1st and 3rd strings are played in the open.
If you play by sliding this form away from the open position, barring the 1st and 3rd string with your index finger, you can play different major chords along the 5th string. It is not necessary to barre across the complete fretboard.
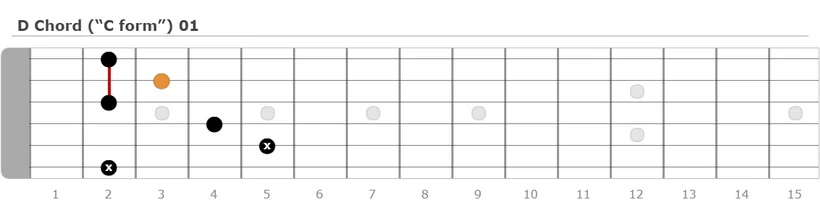
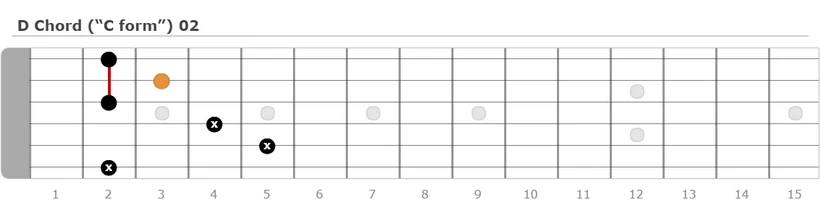
For example, if your little finger is on the 5th fret – 5th string with this form and you are barring the 1st and 3rd string on the 2nd fret, you will actually play the D Major chord in the C form barre chord. Similarly, if your little finger is on the 7th fret, you will play the F Major chord. If it is on the 9th fret, you will play the G Major chord and so on.
Which chord you play will be governed by the fret your little finger is on the 5th string. As a simple rule, whichever note lies on that fret of the 5th string, the major chord with that note as the root, will get played. The concept will be more clear if you carefully study the diagrams above.
Partial forms
As stated earlier, the C-form chord is usually difficult and uncomfortable to play, particularly for new guitar players. When you play any triad, you may play some of the notes multiple times and in different orders, known as chord voicings. Changing the order in which the notes get combined in a chord creates a different voicing. Changing the bass note of the chord but keeping all the notes the same creates an inversion of the chord.
Voicings are even created by breaking any chord into partial forms to make it easy to finger. You can simplify playing the C form barre chord by using different partial forms as indicated below:
Four-note voicing on strings 1 to 4:
You can skip or mute the 5th string and remove your little finger from playing the chord. This is shown in the diagram below.
Three Note Voicing on strings 1 to 3:
Like above, skip or mute strings 4 and 5 and remove your little and ring finger. You are left with the three-note voicing of the chord on strings 1 to 3, as per the below diagram.
Three Note Voicing on strings 2 to 4:
In this option, mute or skip strings 1 and 5 and remove your little finger completely and index finger from string 1 and use it only for string 3. This is the most common way to play C form barre chord, as shown in the diagram below, and sounds good.
Connecting the CAGED Shapes
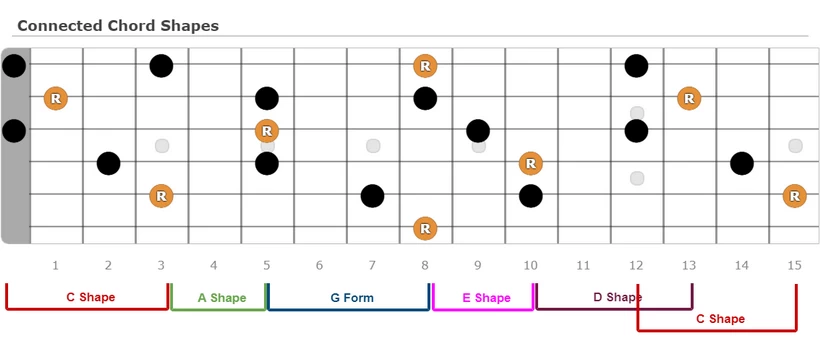
In the last section, you have seen how to play different major chords over the entire fretboard using the C shape. In this section, you will see how you can play the C major Chord over the fretboard using different shapes and how these shapes are laid out over the fretboard.
What’s interesting is that these shapes are connected to each other, as shown in the below diagram. As expected, the C chord shape connects to A, and A connects to G, G to E, E to D, and D back to C.
Barre Chords for the Other Forms
In this section, you will have an overview of the movable barre chords in the other four forms. We will not go into as much in detail as the C form because the concepts are similar.
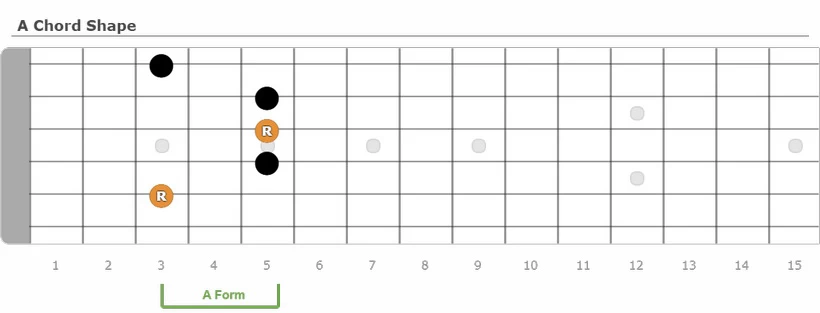
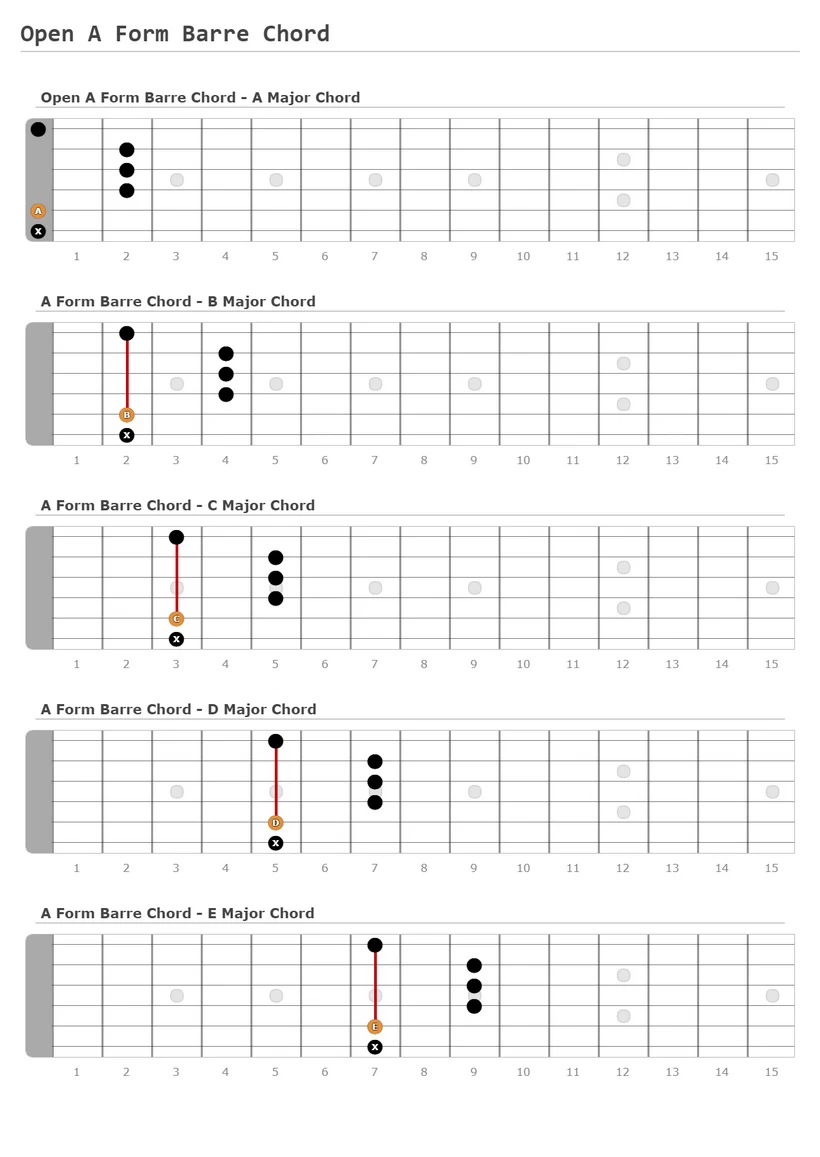
A form Barre chord
This is a very common form If you carefully observe the A form, you will notice the following:
- String 6 is skipped or muted.
- Strings 1 and 5 are used in the open position. So you will have to barre the strings 1 to 5 with your index finger. Build the rest of the chord with your other fingers.
- Notice that the root lies beneath your index finger on string 5.
You can slide the A shape down to play the different major chords, as indicated below:
- B Major chord with your index finger at the 2nd fret.
- C Major chord with the index finger on the 3rd fret.
- D chord – index finger on the 5th fret.
- E Major chord – index on the 7th fret, and so on.
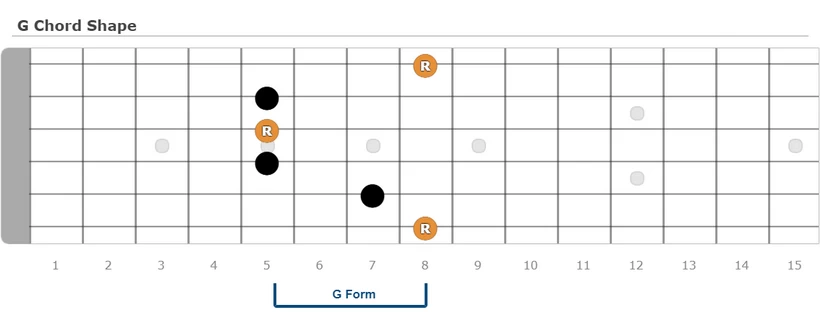
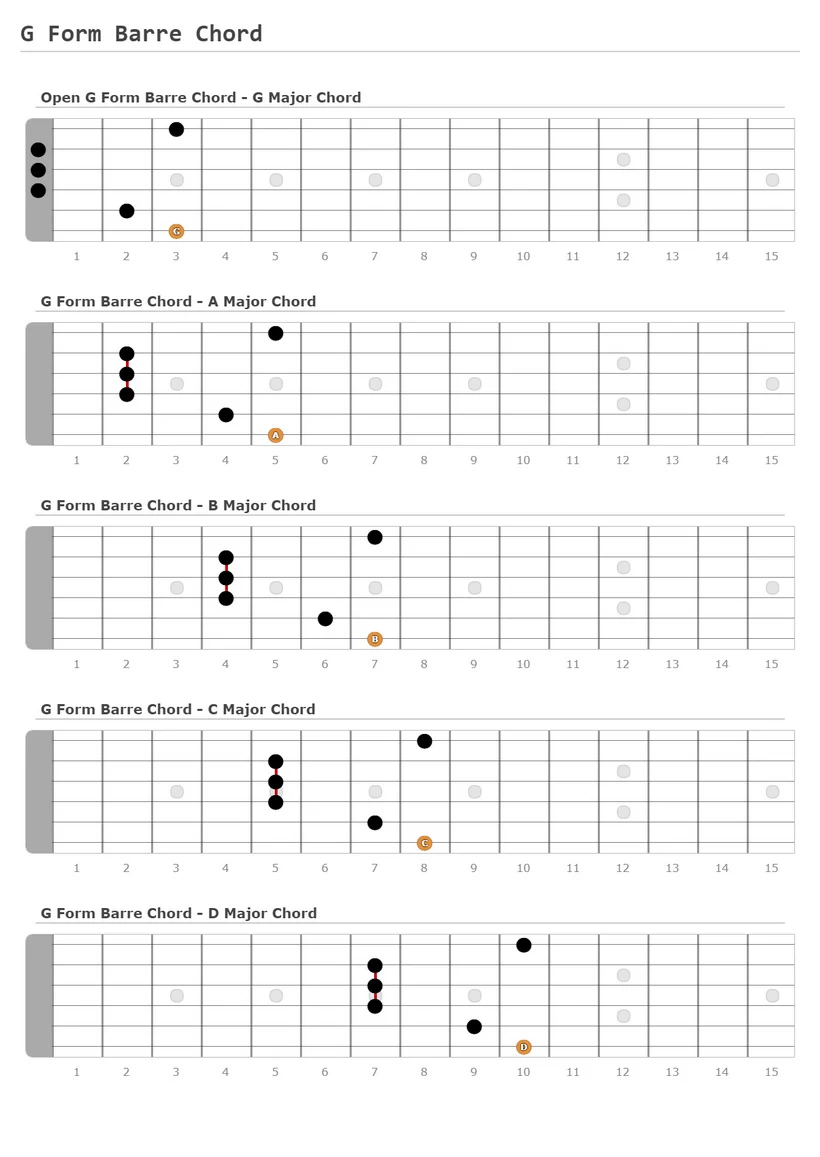
G form Barre chord
The next chord shape of the open G chord shape that gives the following information:
- No string is skipped or muted.
- Strings 2 to 4 are used in the open position. So you will have to barre these strings with your index finger and build the balance chord with your other fingers.
- The root lies beneath your ring finger on the low e string.
You can play the different major chords by sliding the G form barre shape, as indicated below:
- G chord – ring finger at the 3rd fret.
- A chord – ring finger at the 5th fret, and so on.
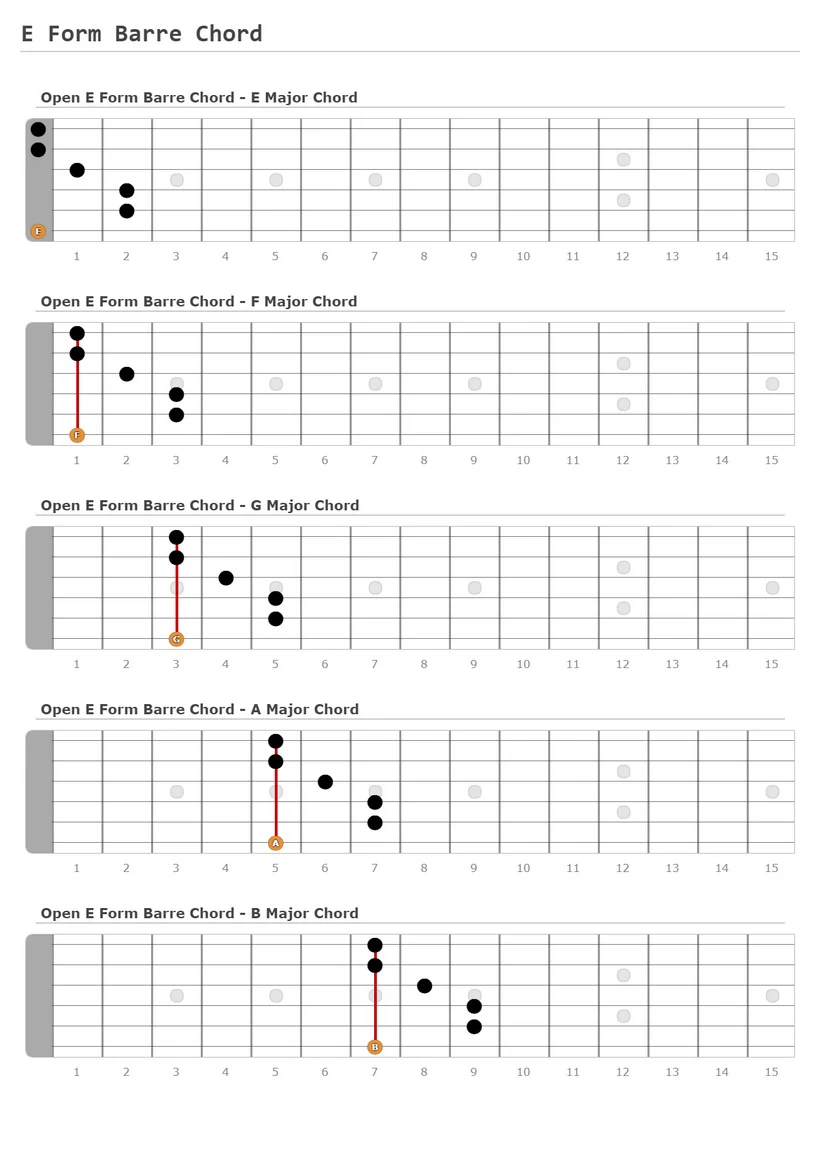
E form Barre chord
This is one of the two most commonly used forms, along with the A form. You get the following information from carefully observing the open E chord shape:
- No string is skipped or muted.
- Strings 1 to 6 are used in the open position. So you will have to barre all the strings with your index finger and build the balance chord with your other fingers.
- The root lies beneath your index finger on the 6th string.
Play the different major chords by sliding the E form barre shape, as indicated below:
- F chord – index finger at the 1st fret.
- F# chord – index finger at the 2nd fret.
- G chord – index finger at the 3rd fret, and so on.
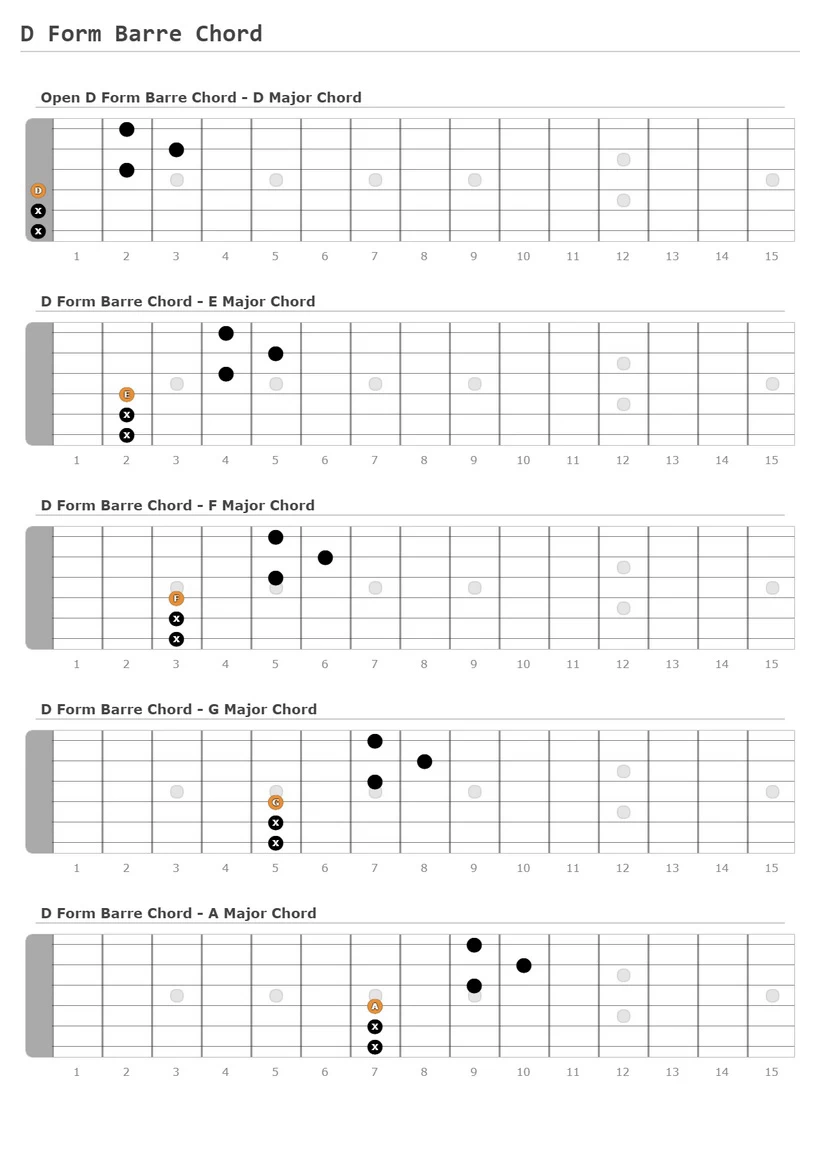
D form Barre chord
Observing the open D chord shape, You will note that
- Strings 5 & 6 are skipped or muted.
- Only string 4 is used in the open position. So you don’t have to barre any string and move the entire shape to play the other major chords.
- The root lies beneath your index finger on the 4th string.
By sliding the D form shape, you will get the other major chords as indicated below:
- F chord – index finger at the 3rd fret on string 4.
- F# chord – index finger at the 4th fret.
- G chord – index finger at the 5th fret, and so on.
Playing Scales with the CAGED Patterns
We discussed the CAGED patterns and their applicability to the pentatonic scales in our detailed article on the subject. We also detailed its usage for D Major Scale in another article. You can go through the details there. Here, we will summarize the general patterns for the minor and major scales that can be applied to any of these specific scales.
The below diagram shows the five major scale patterns for the caged system scales. All the circles represent the notes of the scale in the pattern, the blue and orange color represents the major chords, and the orange color represents the root notes of the pattern in the key of G Major.
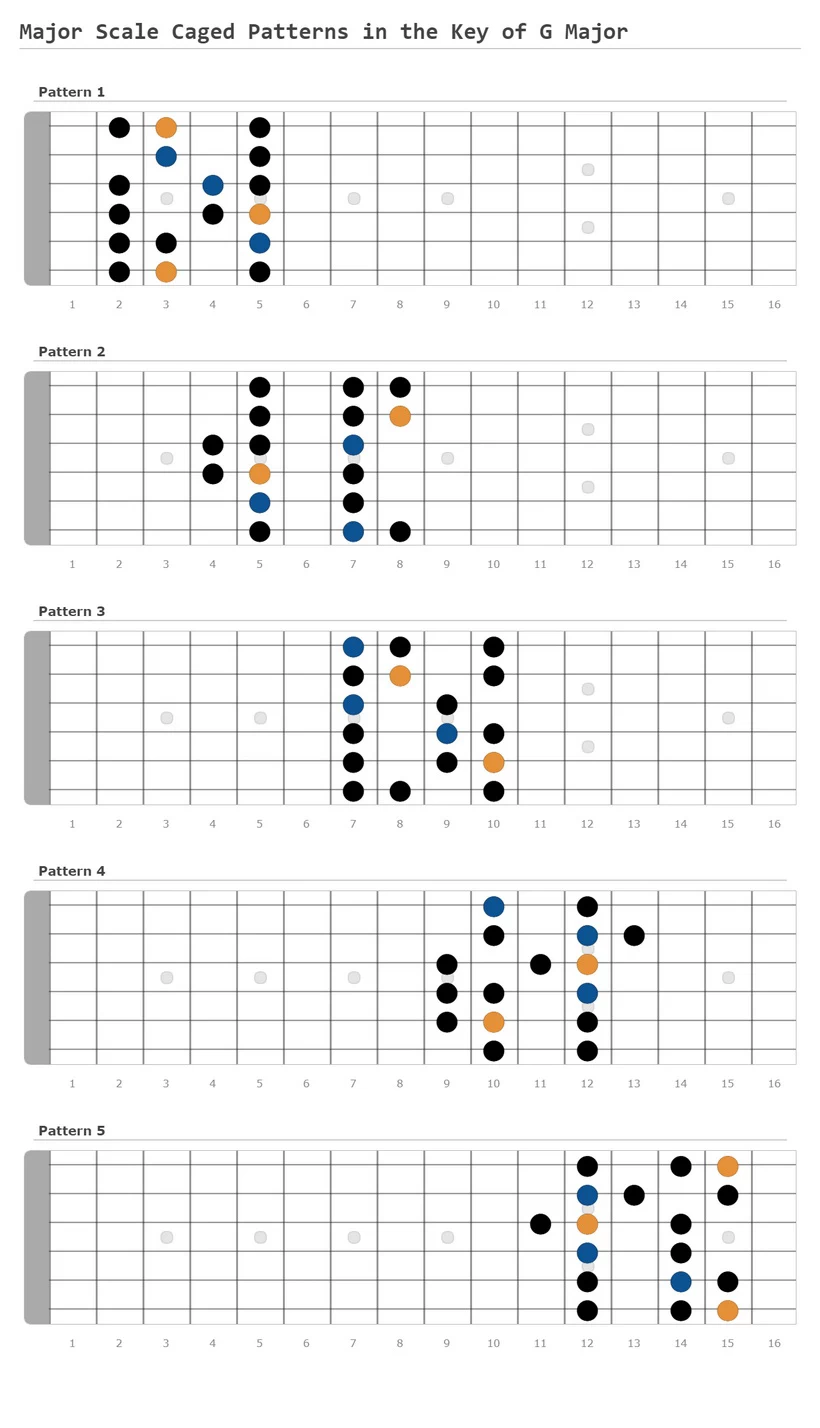
Connecting the patterns Together
The five patterns are connected to get the complete major scale template for the entire fretboard. The current position of the template in the diagrams is for the key of the G major scale.
Like the pentatonic scales, part of the pattern in any shape overlaps with the next pattern, and this part is used to connect the patterns together, as shown in the diagram below.
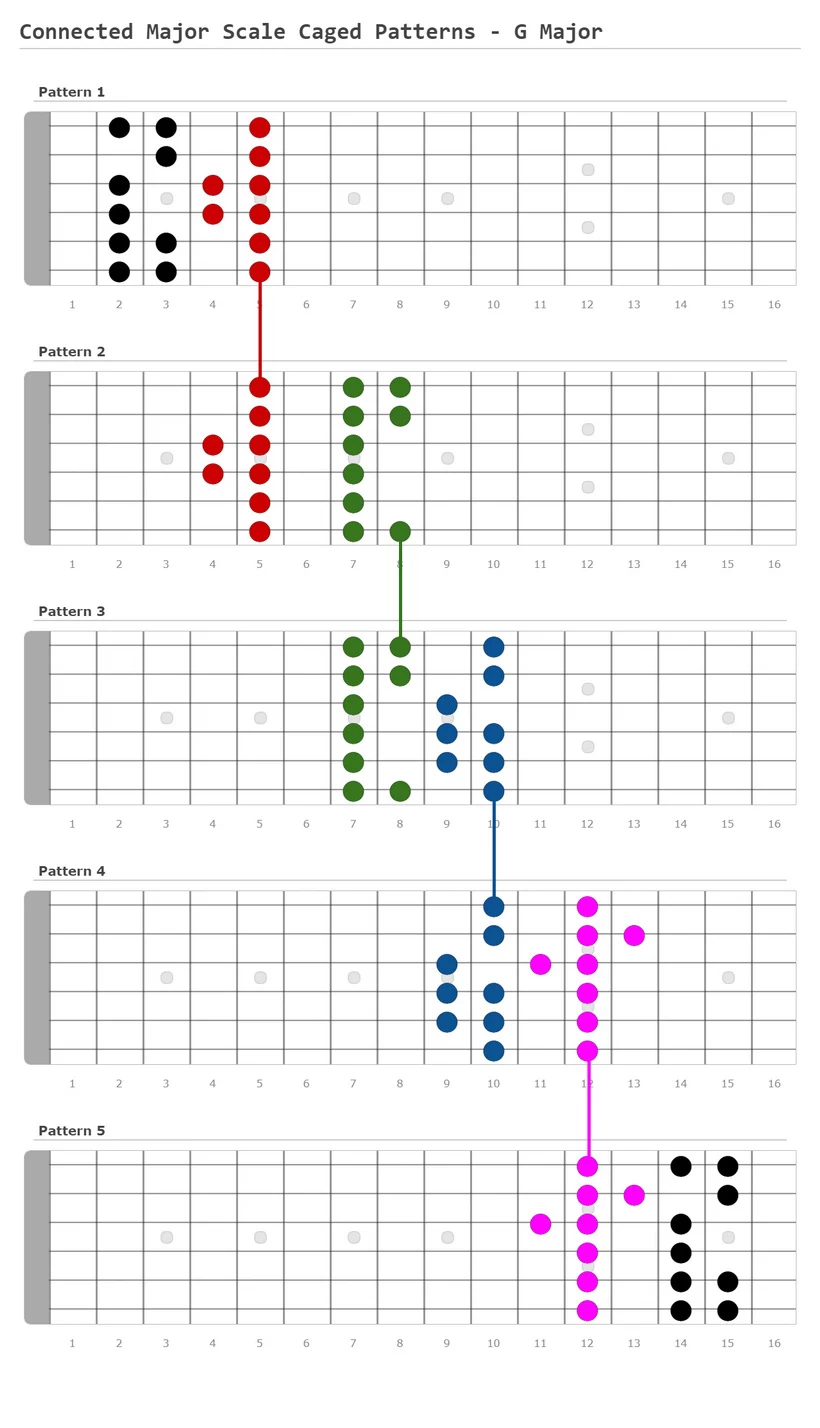
While the diagram shows the connection of pattern 1 to 2, 2 to 3, and so on till pattern 5, you can connect pattern 5 to pattern 1 again and continue the process till you actually run out of frets. If you transpose the whole pattern towards the neck, and some frets are free towards the neck, you can put pattern 5 there and start connecting backward.
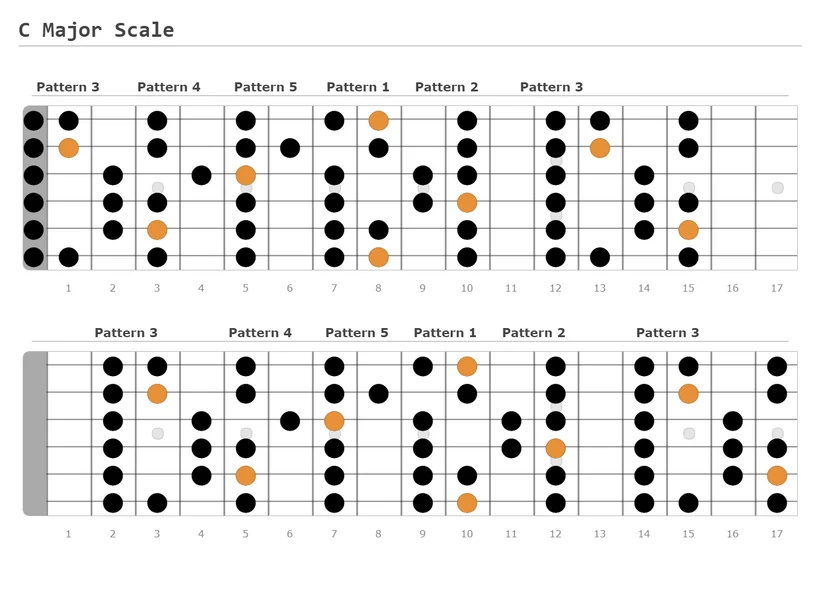
Transposing the Scale Patterns
If you start with pattern 3 in the open position, as shown in the diagram, you get the C major scale. If you further shift this complete pattern by two frets, you will get the D major scale, E Major Scale, and so on.
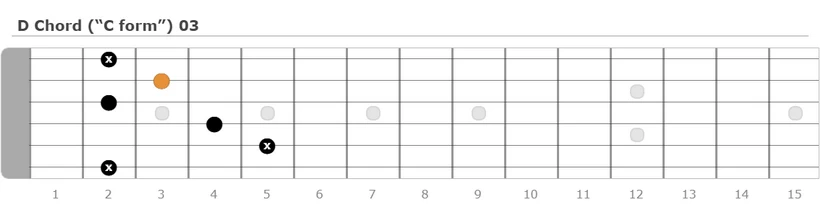
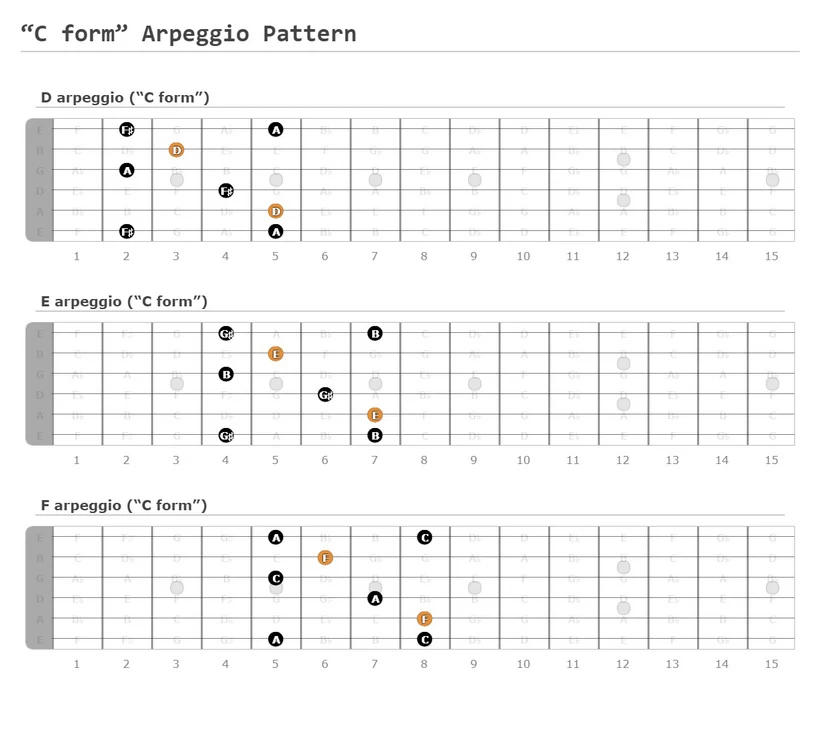
Arpeggio Patterns
As you may be aware, the arpeggios are the notes of the chords that are arranged on the fretboard and played in series in any order instead of playing them simultaneously.
The diagram below shows the arpeggio pattern for the D major chord in C shape chord form. The notes of the D major chord are D, F#, and A. You need to add three notes to complete the pattern. The root is on the 5th fret of the fifth string.
By transposing the pattern and shifting the root to the 7th fret on the 5th string, you will get the E arpeggio. 8th fret will give you the F arpeggio, and so on.
Conclusion
In conclusion, the CAGED system is a great way to learn and understand how chords relate to one another on the guitar. This system can be used as a reference when trying to find new chord shapes or when trying to figure out why a certain chord shape exists. The CAGED system also provides a good framework for understanding how scales are organized on the fretboard. If you have any questions or need clarification about anything in this lesson, please let me know in the comments section below, and I’ll be happy to help. Thanks for reading!
