Interested in learning how to play the guitar?
The fretboard is one of the most important aspects of learning to play the guitar. This is where you will place your fingers to make chords and melodies. Memorizing the notes on the fretboard can be challenging, but with our helpful guide, it can be easier than you think.
Follow our simple methods and practice plan highlighted in this article on Notes On Guitar Fretboard, and you will be able to memorize the notes on the fretboard in no time. You can play any song you want without looking down at your hands!
Read the full article below and get started on your journey to becoming a guitar master!
Why Should You Learn the Fretboard?
It will be a pertinent question in your mind, like all others who have been advised to learn the fretboard. It is always easier to put in your best efforts if you know the benefits. How much can you appreciate it at this stage of your learning process is a different subject? To list down a few benefits:
- Play Barre Chords and other chords easily. You use your index finger to fret multiple strings together to play barre chords, somewhat similar to a capo. Barre chords allow you to play different chords using the same chord shape, so you don’t need to memorize countless numbers of chord shapes. For example, to play the C chord, if you do not remember the C open chord shape, you just need to move to the 8th fret of the low E string and play the barre chord shape. However, you must remember the position of the C note to be able to play the chord.
- Knowing the fretboard allows you to play any chord at different positions of the fretboard instead of being limited to the open position. The same chords may sound similar but have a different feel when played at different positions.
- It allows you to improvise if needed.
Fretboard Guitar Theory
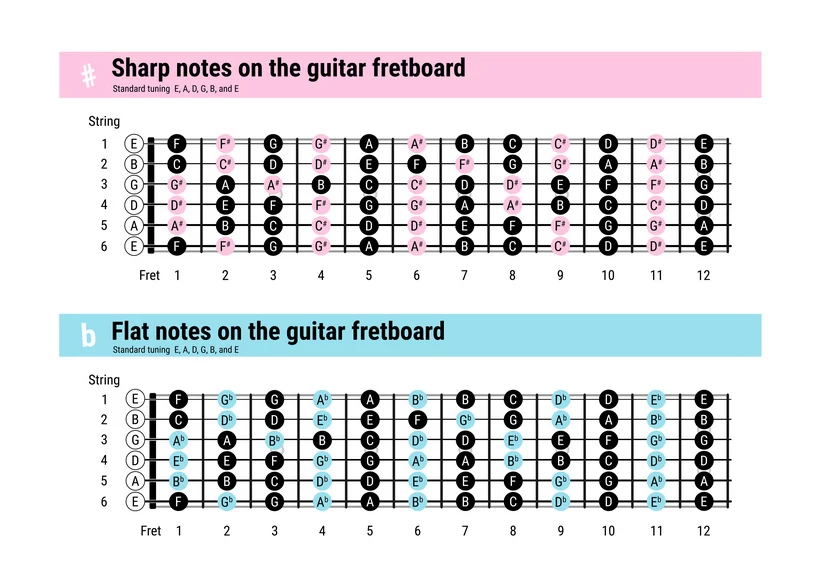
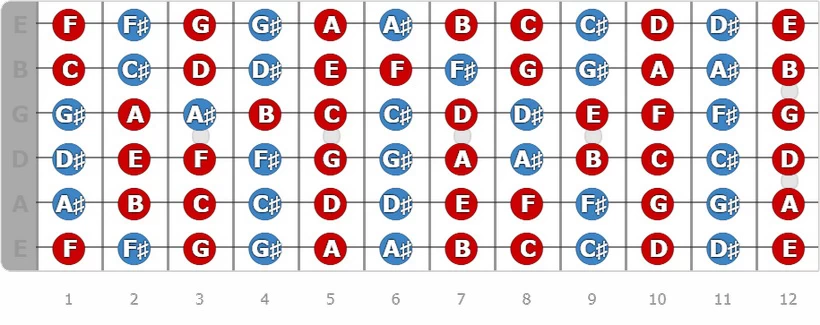
The below diagram shows all the notes on the guitar fretboard, known as the fretboard diagram. At first glance, it appears a very daunting task to memorize them and can be really overwhelming for beginners. Hence, most guitarists tend to delay their plunge into this seemingly impossible task of learning the position of the guitar fretboard notes.
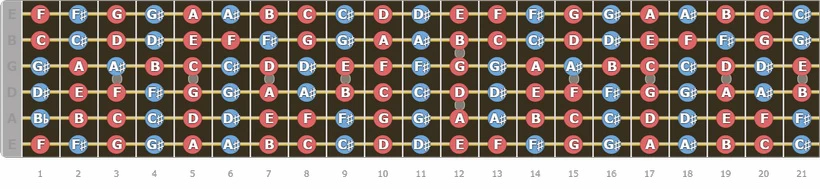
The job on hand is quite doable if you follow the step-by-step method and slowly but regularly practice what you are going to learn in the following article.
On piano, all the natural notes [A B C D E F G] are represented by the white keys and all the incidentals (sharps and flats) by the black keys, making it easier to learn the notes. On guitar, you don’t have similar things to help you navigate, but you have the open strings to act as a starting point and the inlay dots to serve as reference points.
Some important elements of the guitar fretboard theory to help you memorize the fretboard notes are
#1 Name of the Open Strings.
This article will only deal with six-string guitars, so your guitar carries six strings named “E A D G B E” from left to right. This sequence is also referred to as the standard tuning. You get open string notes if you play these strings without pressing frets on them.
The thickest string on the left has the lowest pitch and is called the “low E string.” The pitch increases as you move from the left to the right, and the thickness of the strings will decrease. You have the thinnest string on the right, known as the “high e string.“
Quite unintuitively, the thinnest string is referred to as the first string and the thickest one as the sixth string. So, the numbers from thinnest to thickest string against the direction followed by standard tuning. The below picture shows the relation.
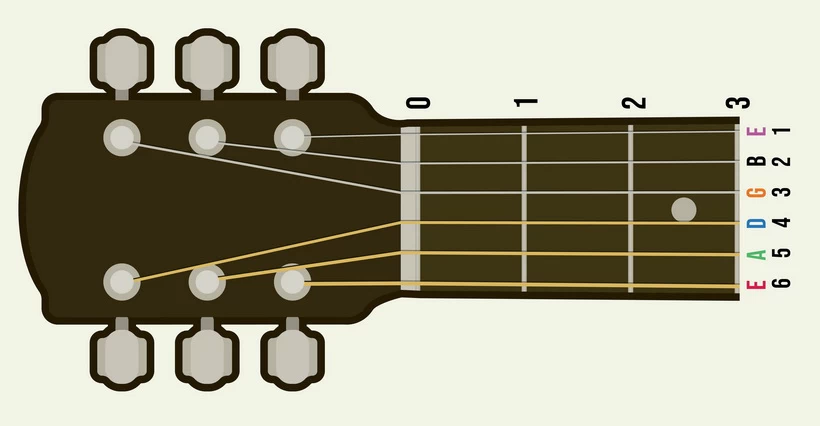
We shall be using the “E” to designate the lower E string and “e” for higher E henceforth.
#2 Fretboard layout
Depending on your guitar type, you may have 20, 21, 22, or 24 frets on it. Each fret represents one note on the guitar. Most guitars either have a dot or any other decorative symbol at particular fret positions known as the “inlay markers.” These are usually found on the 3rd, 5th, 7th, 12th, 15th, 17th, and 19th frets. You might also have markers at the 21st and 24th frets if you have more frets on your guitar.
The 12th fret has a distinct inlay marker by either having two dots instead of one or something more decorative to make it more prominent than the others. You will understand the reason when we discuss octaves.
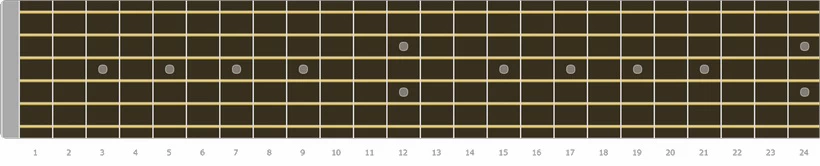
The dots on the guitar fretboard and the sides facing the eyes act as reference points for orientation, navigating the fretboard on the guitar neck, and decorative purposes. They help us find our way around the fretboard without counting the frets from the nut.
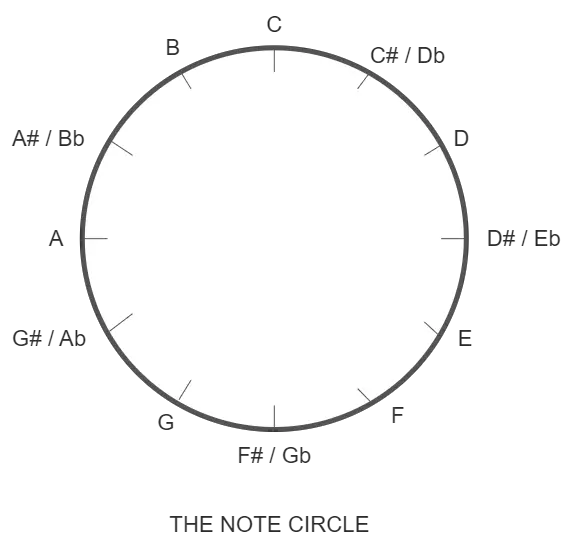
#3 Note Circle
In our article on the guitar music theory, you had a detailed introduction to all the 12 notes in Western music and the concept of the note circles. Starting with any open string notes, you can know the note names on the same string from the nut to the octave by simply moving clockwise on the note circle fret by fret.
Moving clockwise on the note circle up to the 6th fret and counterclockwise from the 6th to the 12th fret gives you the note name faster.
#4 Repetition after 12th Fret
The notes on any string repeat after 12 frets (twelve half notes), implying that the 12th fret note is the same note as on the open string, just one octave higher. This also implies that the 13th fret notes on any string are the same notes as the first frets, and so on.
This makes your task easier, as you just need to remember the guitar notes up to the 12th fret only, as all the notes after the 12th fret repeat themselves.
Memorizing notes on guitar fretboard
With the above background, let us now deep dive into the actual methods that will improve your fretboard knowledge and help you memorize the guitar notes on the fretboard. It will be more beneficial if you follow the sequence in the steps below.
A. Counting Notes from the Note Circle
You were briefly introduced to the note circle in the previous section. This exercise aims to arrive at the note names quickly once the name of any of the notes and fret distance on the same string is known.
Suppose you want to find the note on the 4th fret of the sixth string. You will start from note E on the note circle and move four clockwise positions (F, F#, G, G#) to reach G#/Ab, the 4th fret on the sixth string. Similarly, you can find the 9th fret A string by moving three positions counterclockwise from note A (Ab, G, Gb) to reach F#/Gb.
It is customary to use the designation of sharp notes while moving clockwise and that of a flat note while moving counterclockwise. Both designations are indicated above while writing the final note for clarity.
It is recommended that you exercise on a similar pattern for at least 15 note names every day until you can do the exercise without keeping a note circle in front of you.
B. Six Key Tones
The method that we usually follow in our music training institute is to familiarize our students with the notes on the E and A strings and memorize them. This is followed by teaching them the easy octave correlations between the notes on these two strings and the other strings, making memorizing the notes on the balance strings very easy.
You may be wondering about the significance of these keynotes. You will be using them as root notes in chords, scales, and a large number of songs.
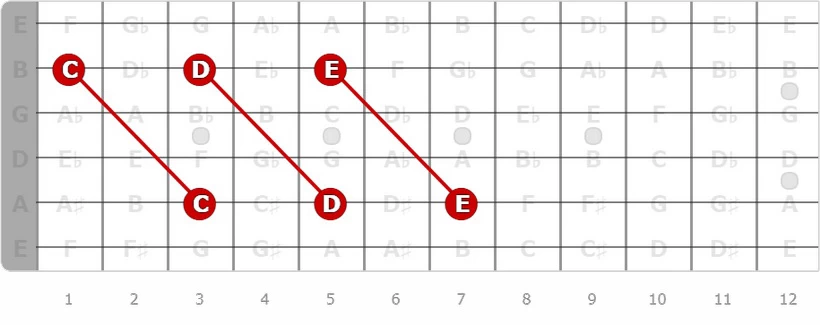
These six key tones or notes occur on the E and A strings’ 3rd, 5th, and 7th frets. You can recall from the earlier discussions that these fret positions have dot markers to facilitate easy identification.
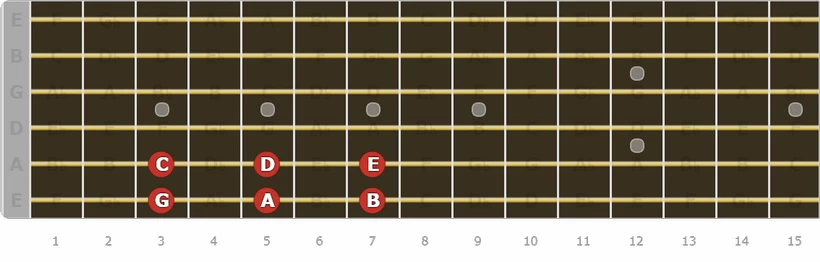
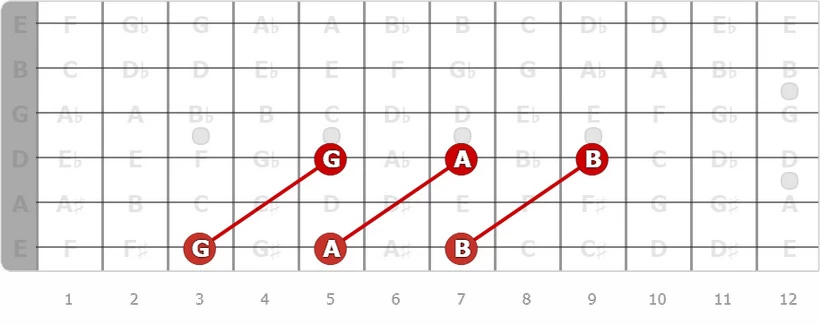
The six keynotes are C, D, and E on the A string and G, A, and B on the E string. These are the root notes of I, ii, iii, IV, V, and vi chords as per the Roman numeral designation for the G Major scale.
The fretting hand can move horizontally towards the nut (left), towards the bridge (right), or vertically up (towards E string) or down (towards e string) if you are a right-handed guitar player.
C. The Notes on E and A strings
As already indicated above, you need to learn the guitar fretboard notes up to the octave position, as everything repeats itself beyond that. You should spend a lot of time and effort mastering this step, as the notes on the other four strings will be derived from them.
Start by preparing a fretboard drawing as presented below, which shows the open strings, the six key tones presented in the previous section, and the octave notes. Use this diagram to mark the balance notes by hand.
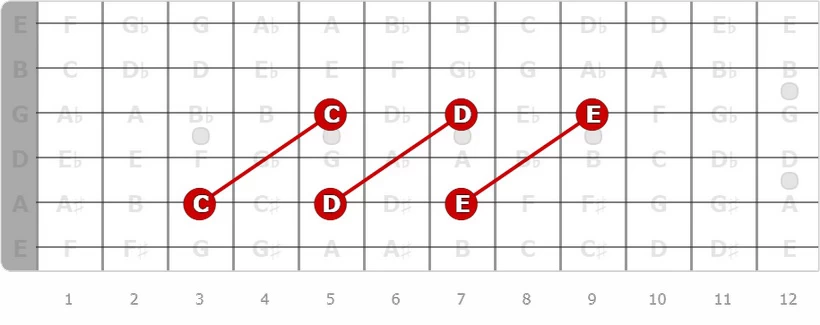
The next step is to know and mark the positions of the other three natural notes on these two strings up to the octave. You already have the four natural notes out of seven on each string – the open string note and the three keynotes.
Here the BC and EF exception in the music theory comes into play, whereby B & C notes and E & F notes are only half step or one fret away from each other, as against the other natural notes that have an interval of two frets.
Using this, you can fill the first & eighth fret on the E string with F and C notes and the second & the eighth fret on the A string with B and F notes. Now you are left with one natural note on each of the two strings and no exceptions. This note must be two halftones away from the eighth fret because all natural note positions till the 8th fret are full. So, it lies on the 10th fret, and its name is very easy to figure out, as below.
On the 8th and 12th fret of the E string, we have C and E, so the note on the 10th fret must be in between these two notes, D. In the same way, the note on the low second string is G.

Fill in the empty positions on these strings with the sharp versions of the notes on the previous frets. For example, the first fret on the E string is F and the second fret position is empty. It will have the note F#. If you are moving from the octave position towards the nut, you can use the fret’s note name after the empty position with a flat designation, like Gb, in the previous example. This is because the third fret has a G note.
D. Notes on the D string
As introduced earlier, you can use the relation between the notes on the first two strings with each of the balance four strings to find the guitar fretboard notes on them quickly. Let us begin with the D string.
The third note on the E string is G, a keynote. If you want to locate the position of G on the string D, you will find it to be on the 5th fret. But, it is one octave higher than the G. Similarly, other keynotes of the E string, A and B, lie on the 7th and 9th fret of string D.
The same concept applies to all the balance notes. The C note on the D string will lie on the 10th fret instead of the 8th fret on the E string. So, you just have two add two frets to the position of any note on the E string to get its position on string D.
This logic works for the 3rd to 12th fret on string D. For the 1st and 2nd fret, since the notes circle repeats after twelve notes, the 11th and 12th fret on the E string will apply.
E. Notes on the G string
You can apply the same pattern to find the notes on the G string. You just need to use the A string instead of the E string as the starting point. The keynote C, found on the third note of the A string, lies on the fifth fret of string G. The D note is found on the 7th fret, and so on. In essence, you can add two frets from the position on string D to obtain the fret number on string G.
Like the string D, this method applies from the 3rd to the 12th fret. The 1st and 2nd frets are the same as the 11th and 12th frets on the A string.
F. Notes on the B string
You should use A as the starting string for the notes of the 5th string. You will find that you can name the first 10 frets by going two frets backward this time. This means the note on the 3rd fret of the A string becomes the note on the 1st fret of the B string, and so on. The 11th and 12th frets on the fifth string carry the same notes as the 1st and 2nd frets of the A string, though one octave higher.
G. Notes on the e string
The high e string carries the same guitar notes as the E string, and all the notes are in the same fret positions, with the only difference being that, unlike other octave shapes discussed so far, these notes are two octaves higher than the lower E string.
H. Some Interesting Observations about the Fretboard Layout.
So, you would have finished populating the fretboard chart with all the guitar notes up to the octave. If you observe closely, you will find that the open string position, 5th fret, 10th fret, and 12th fret contain only the natural notes, while the 11th fret has only the sharps or flats. All other frets have mixed notes.
Using Chromatic Scale pattern to Learn Notes on the Guitar
You can also find out and memorize the fretboard notes using the chromatic scale, as explained in Section 7 of our article on the different aspects of the chromatic scale. Don’t worry if you are still not familiar with scales. You will get introduced to its basic concepts here enough to understand and figure out the note positions.
The Basics
All the notes starting on any string from the open note up to the 11th fret form a chromatic scale. For example, on an A string, the notes are A, A#/Bb, B, C, C#/Db, D, D#/Eb, E, F, F#/Gb, G, G#/Ab. These 12 notes represent a chromatic scale. You can start on any fret on any string and move in half steps till one-half step before the octave. You will get a chromatic scale. It is shown in the image below.
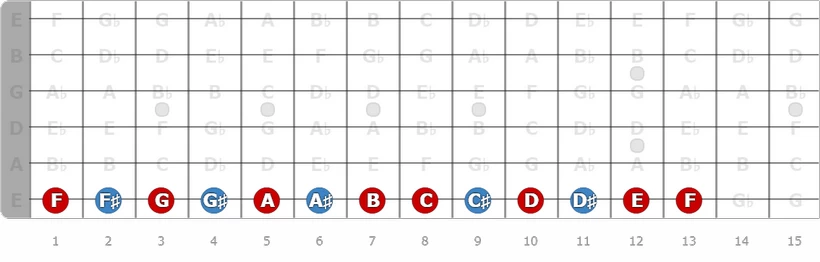
Besides following it on any one string, there are two more patterns in which it is laid down on the fretboard, which will help you memorize the fretboard notes.
The First Method
You should carefully observe the fretboard notes sheet that you prepared by the first method and note the following.
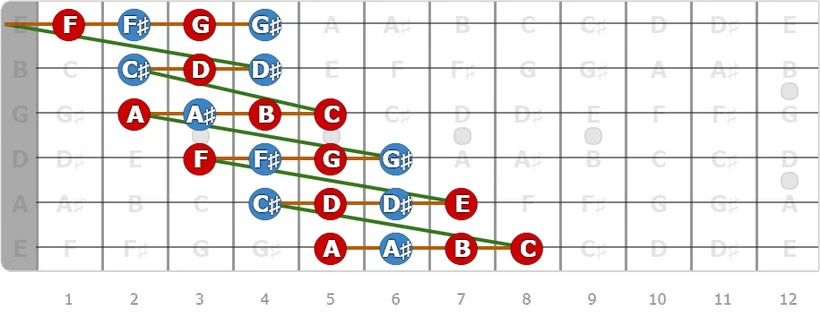
A. the First Pattern (Up To 4th Frets)
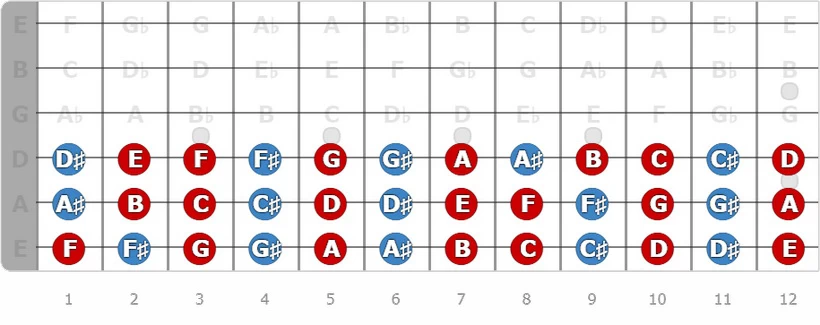
Focus on all the strings from the open string position to the fourth fret. Start from the E note (on the E string) and move right up to the fourth fret G#/Ab note. Jump to the open string note on the A string and continue moving up to the fourth fret before again jumping to the open note on string D.
If you follow this pattern up to G# on high E, you are following a chromatic scale, and by the time you reach G#, you are already two octaves higher. The only exception is that you need to go only up to the third fret on the G string.
The complete layout is shown in the diagram below.
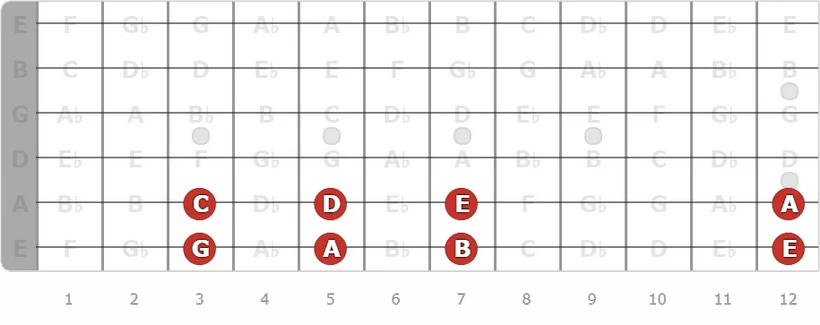
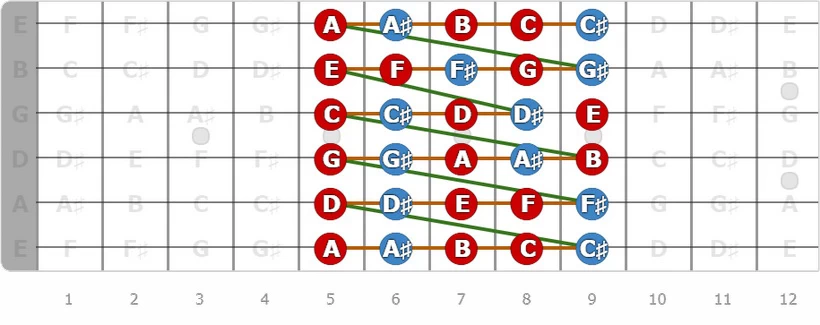
B. The Second Pattern (5th Frets to 9th Frets)
You can jump over to the fifth fret on the sixth string from the fourth fret on the first string. Follow the same pattern and exception from the 5th fret to the 9th fret. You will get the same results as above, as shown in the diagram.
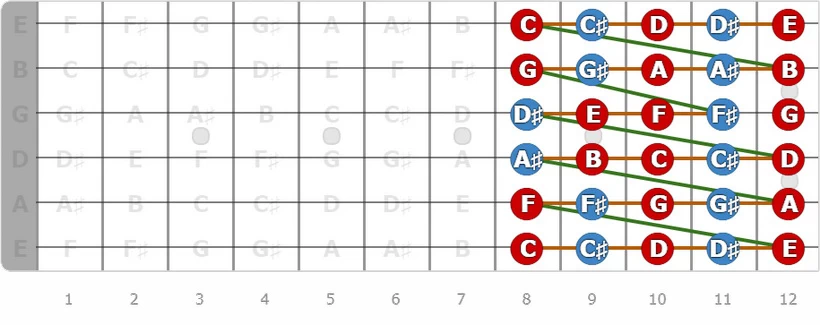
C. The Third Pattern (8th Frets to 12th Frets)
You can follow the same method from the 8th to the 12th frets starting at note C on the eighth fret, sixth string, as shown in the diagram.
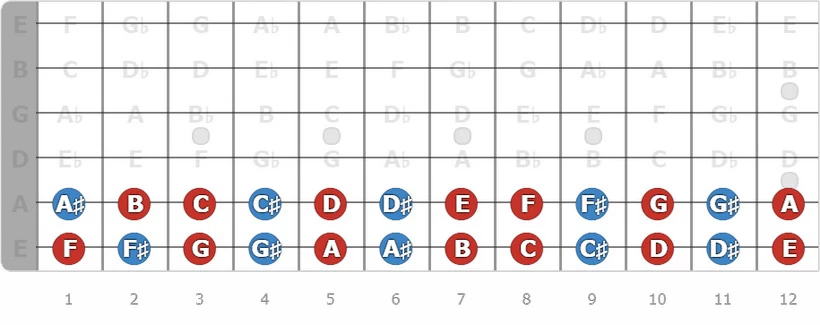
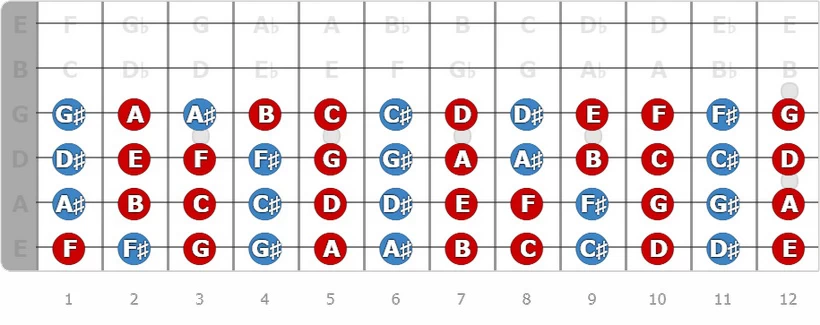
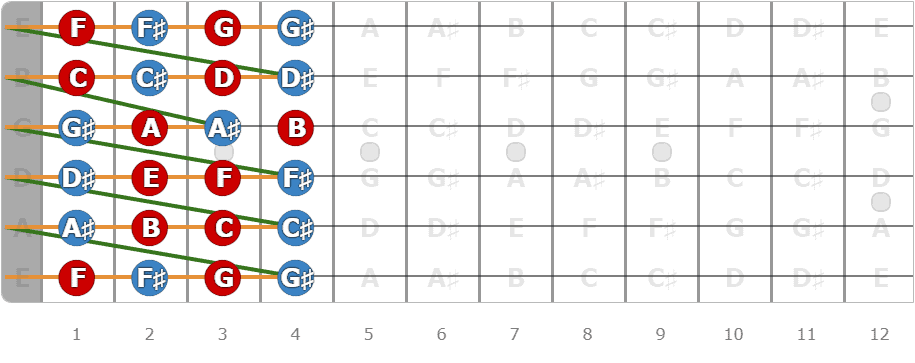
The Second Method.
The below diagram clearly indicates the pattern in which the chromatic scale notes are laid out on different strings in a diagonal pattern, whereby after moving four frets, you jump back up to one fret before the starting point on the previous fret, with the exception of the B string, where the fret movement is limited to 3 steps.
Conclusion
Memorizing the fretboard can be an extremely valuable skill for guitar players of all levels. In this article, we’ve outlined two different methods that you can use to memorize the notes on the fretboard. We also provided a practice plan that will help you get started. Let us know which method worked best for you in the comments section and how you’re progressing with memorizing the fretboard. Happy practicing!
