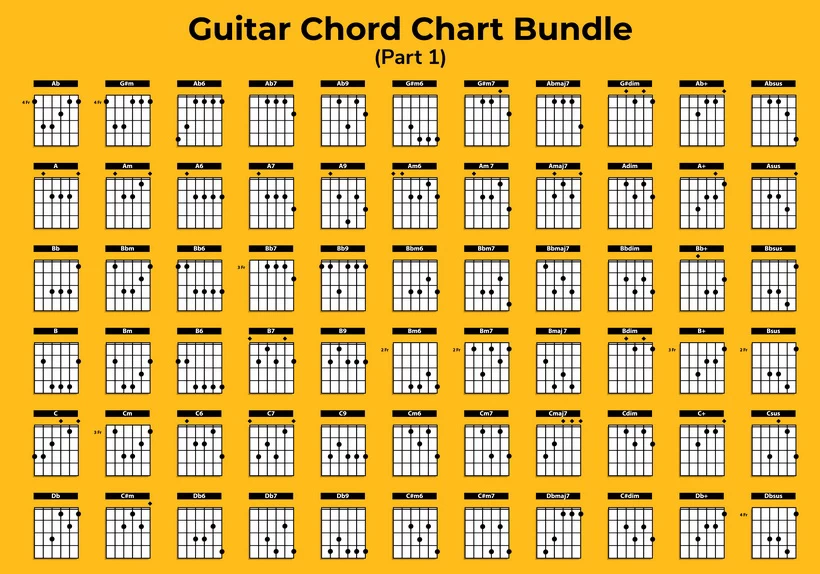
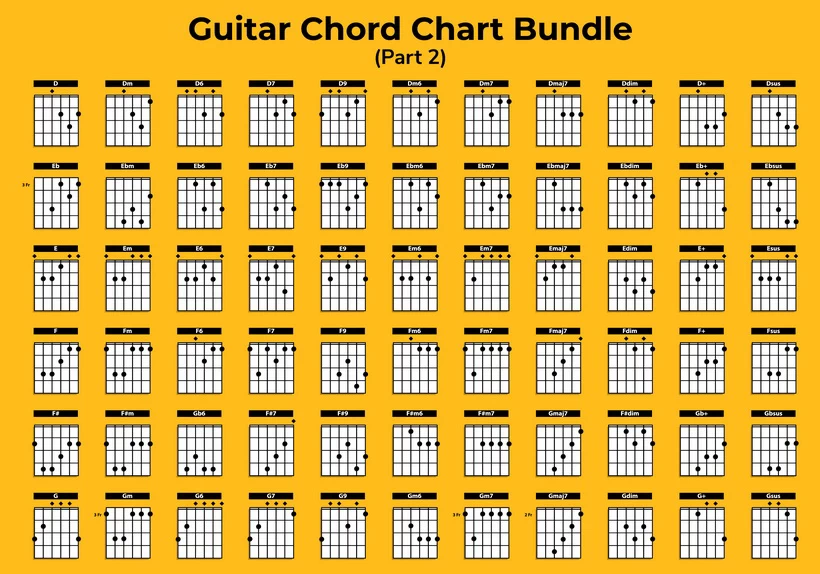
If you're relatively new to guitar, you might be just learning the basic guitar chords. But what if you want to be able to double-check that you're playing them correctly? Or if you want to learn a few more chords? Being able to read a guitar chord chart or guitar chord diagram is an essential part of playing guitar. In this list, we'll show you how to read chord diagrams and help you understand how they can help you grow as a guitarist.
Reading a Guitar Chord Chart: A Beginner's Guide
1. What Exactly Is A Chord Diagram?
You may have seen guitar chord charts with several small, grid-like rectangles marked with dots. They look like this:
These little grids are known as "chord diagrams." As you may already know, a chord is a collection of three or more notes. Most new guitarists start out learning chords and only later move on to playing lead. And the easiest way to learn new chords is to learn to read chord diagrams!
Chord diagrams represent the guitar neck and show you where to put each finger to play a given chord. The diagrams are rectangular, and each rectangle represents the relevant portion of the guitar neck. As you can see in the above picture, each diagram looks like part of the neck if the guitar is hanging vertically.
For a video intro to chord charts and diagrams, check out this helpful video!
2. Reading Chord Diagrams For Open Chords
As you may have guessed, the vertical lines on a chord diagram represent the with six strings on the fretboard. The horizontal lines represent the frets, with the thickest of the horizontal lines (the one at the top) representing the nut.
It can be hard to remember which lines represent which strings. The vertical line to the left is the thickest string (the low E string).
Thankfully, the low E string on a chord diagram is usually thicker than the other strings. The thinnest string on the guitar (the high E string) is also the thinnest string on a chord diagram. In some cases, all six strings are the same width, though.
** On a left-handed chord diagram, the low E string and high E string are on opposite sides: the low E is on the right and the high E is on the left.
Wondering what finger to use on a particular string? On the guitar strings on the diagram, you may notice circles with numbers in them. The numbers indicate finger placement.
The picture below illustrates the finger numbers:
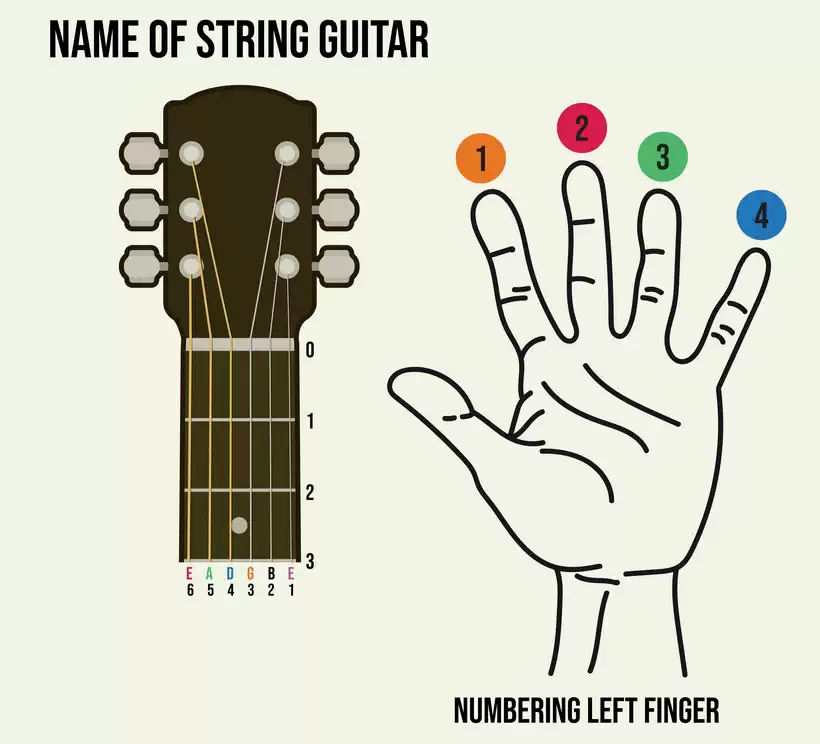
Some chord diagrams will not include finger numbers. But in this case, figuring out which finger to use is almost always pretty intuitive.
As you start to read guitar chords from diagrams, you may sometimes see a number beside the horizontal lines. The number will indicate what fret is shown. However, this is typically only used for chords fairly far down the neck.
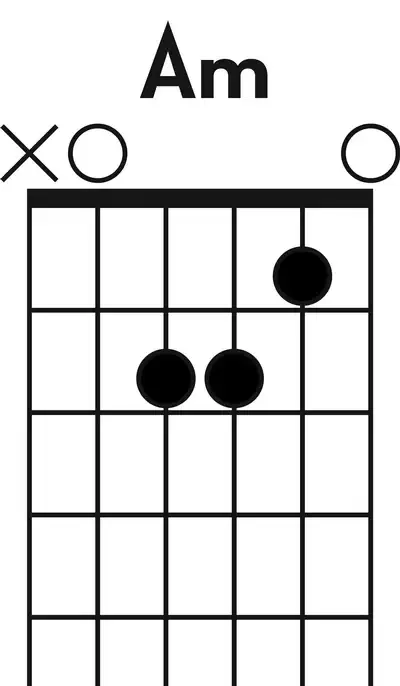
You also may see an "x" above one vertical line (or more). These marks indicate muted strings (or at least strings you don't play).
Usually, you'll see an "o" above the strings without finger numbers. As you may have guessed, the "o" indicates an open string.
Here's an A minor chord diagram that illustrates how the x and o markings work
For a little more help on reading chord diagrams, check out this useful video!
3. Why Is Reading Chord Diagrams Important?
Some people refer to diagrams as guitar chord charts. But a guitar chord chart can also refer to a poster or file that includes several diagrams. Once you've gotten the hang of reading chord diagrams, you might think a chord chart is a wise investment!
If you want to learn new chords, knowing how to read guitar chord diagrams will make it significantly easy. Being able to read guitar chords from a simple diagram will save you a lot of time. Video tutorials like this one can often show you how to play a specific guitar chord.
But if you're in a hurry or just need to refresh your memory, it's a lot easier to just glance at a chord chart on the wall!
If you spend any time at all on sites like Ultimate Guitar, you've probably noticed that each song includes several chord diagrams at the top of the page. If you see an unfamiliar chord, being able to read guitar chords from diagrams will save you from needing to search for tutorials.
4. Basic Chords: C Major
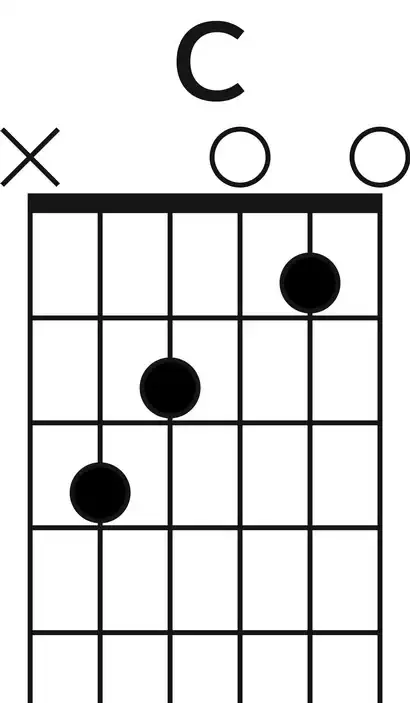
As you learn to read guitar chord charts, the C major chord is probably one of the first ones you will learn. Here's the chord diagram:
Under the top horizontal line, you'll see the notes played. Use your first finger to fret the second string at the first fret. Use your middle finger to fret the fourth string on the second fret. And lastly, use your ring finger to fret the fifth string at the third fret. Don't play the sixth string.
For video guidance on how to play C major, check out this helpful tutorial!
5. Basic Chords: A Major
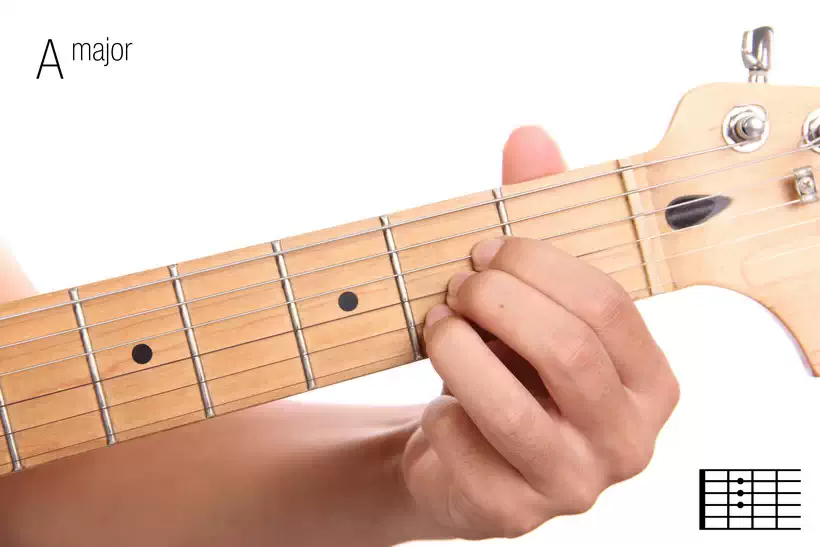
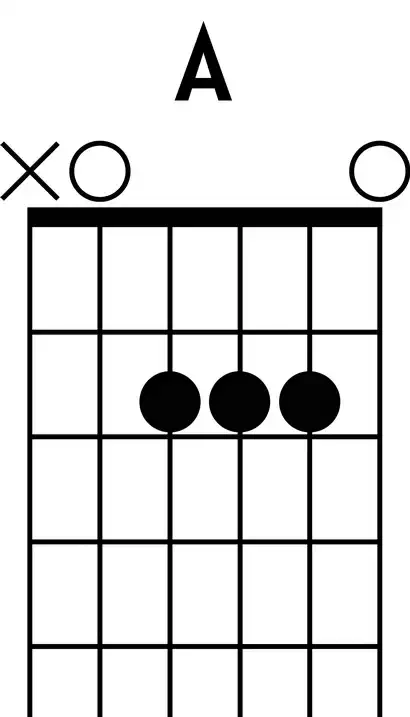
A major is also one of the first chords you'll probably learn. Here's the chord diagram:
As you'll see under the thick line (the nut), you don't need to fret anything at the first fret. All three fingers will be on the second fret: put your index finger on the fourth string, your middle finger on the third string, and your ring finger on the second string. Play the fifth and first strings open, but don't play the sixth string!
Here's a useful tutorial on how to play A major in a few different ways!
6. Basic Chords: G Major
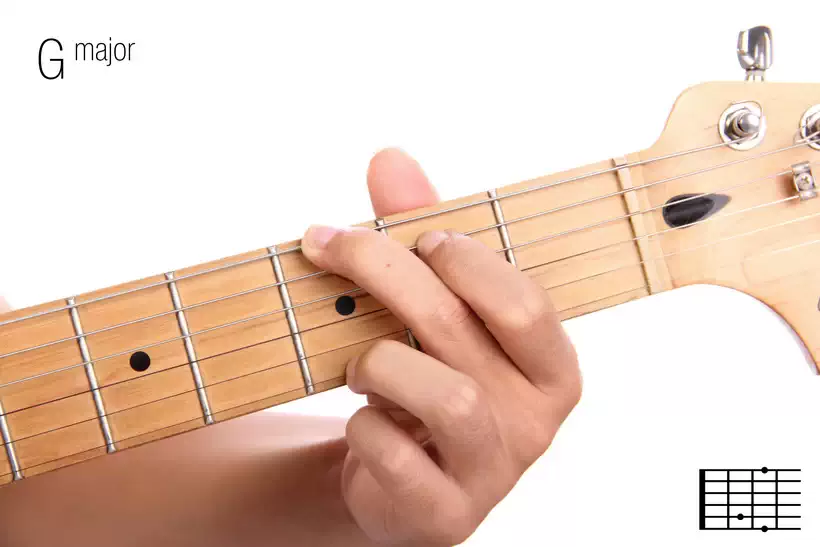
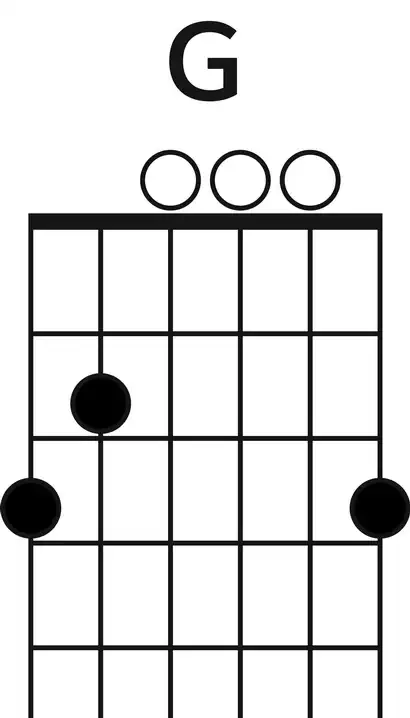
The G major chord is often used at the end of a chord progression -- it has a bright, happy sound that still seems to inspire a sense of calm too. Here's a chord diagram:
Your first finger will be at the second fret on the fifth string. Then at the third fret, put your middle finger on the sixth string. Lastly, put your ring finger on the first string at the third fret.
Your pinky finger occasionally may be needed if you play what some people call the "four-finger G." For this one, you can put your ring finger on the second string at the third fret. Then, you can put your pinky on the first string at the third fret. Check out this useful G chord tutorial!
7. Basic Chords: E Major
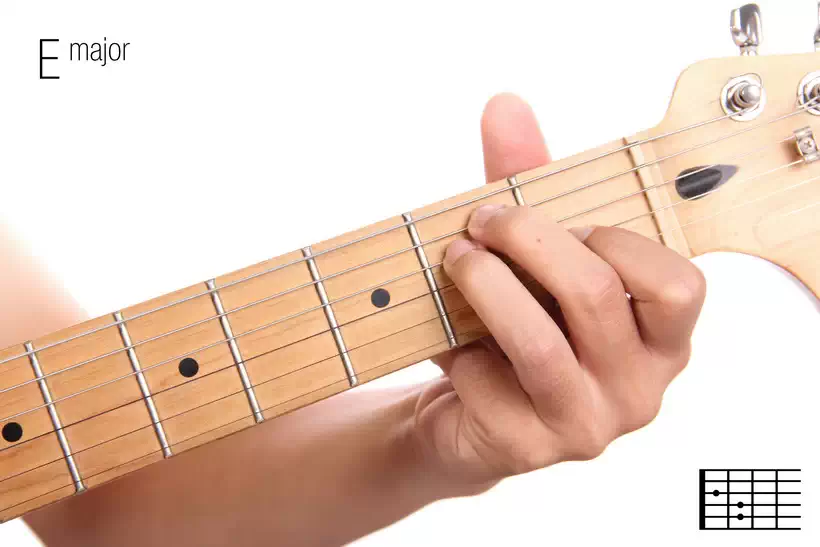
You can find the E major chord on just about any guitar chart. And as we'll see a bit further down, this is one of the first shapes you'll get to apply to barre chords. Here's the chord diagram:
This is a fairly beginner-friendly chord, as you don't need to worry about muting any strings. To play this one, put your first finger on the G string at the first fret.
Then, put your middle finger in the A string at the second fret. On the D string, put your ring finger on the D string at the second fret. To see and hear this chord for yourself, check out this video tutorial!
8. Basic Chords: D Major
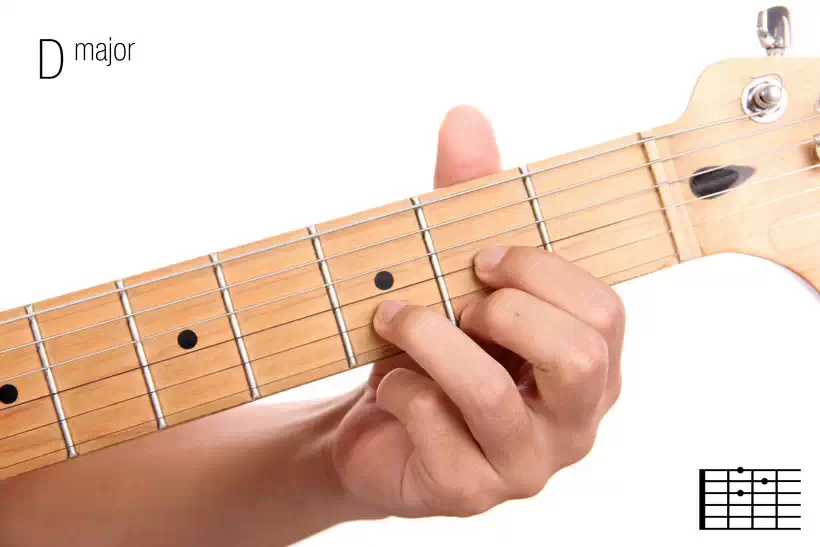
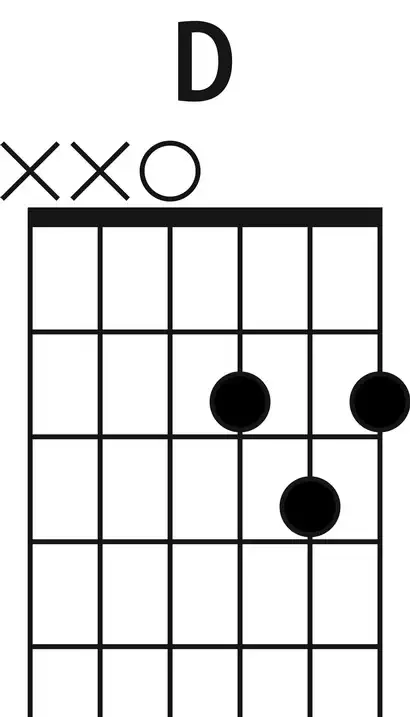
The D chord is the last of the five "basic" chords. It's also good practice for playing some strings and not others. In the open version, you need to skip both the sixth and fifth strings. Here's the chord diagram:
Here's how to play the D chord. At the second fret, put your first finger on the G string and your middle finger on the high E string. Then at the third fret, put your ring finger on the B string.
You'll need to play the D string (the fourth string) open. Don't play the sixth string or fifth string! If you'd like to see it, check out this helpful tutorial.
Once you've learned how to play these five chords, you will have a great foundation for learning more chords (and learning to play lead guitar, too!).
9. Beyond Basics: Using Chord Shapes For Barre Chords
You might wonder why the C, A, G, E, and D major chords are considered to be the "basic" open chords beginners learn. That's because these chords are also used in barre chords-- what many people consider to be "advanced chords."
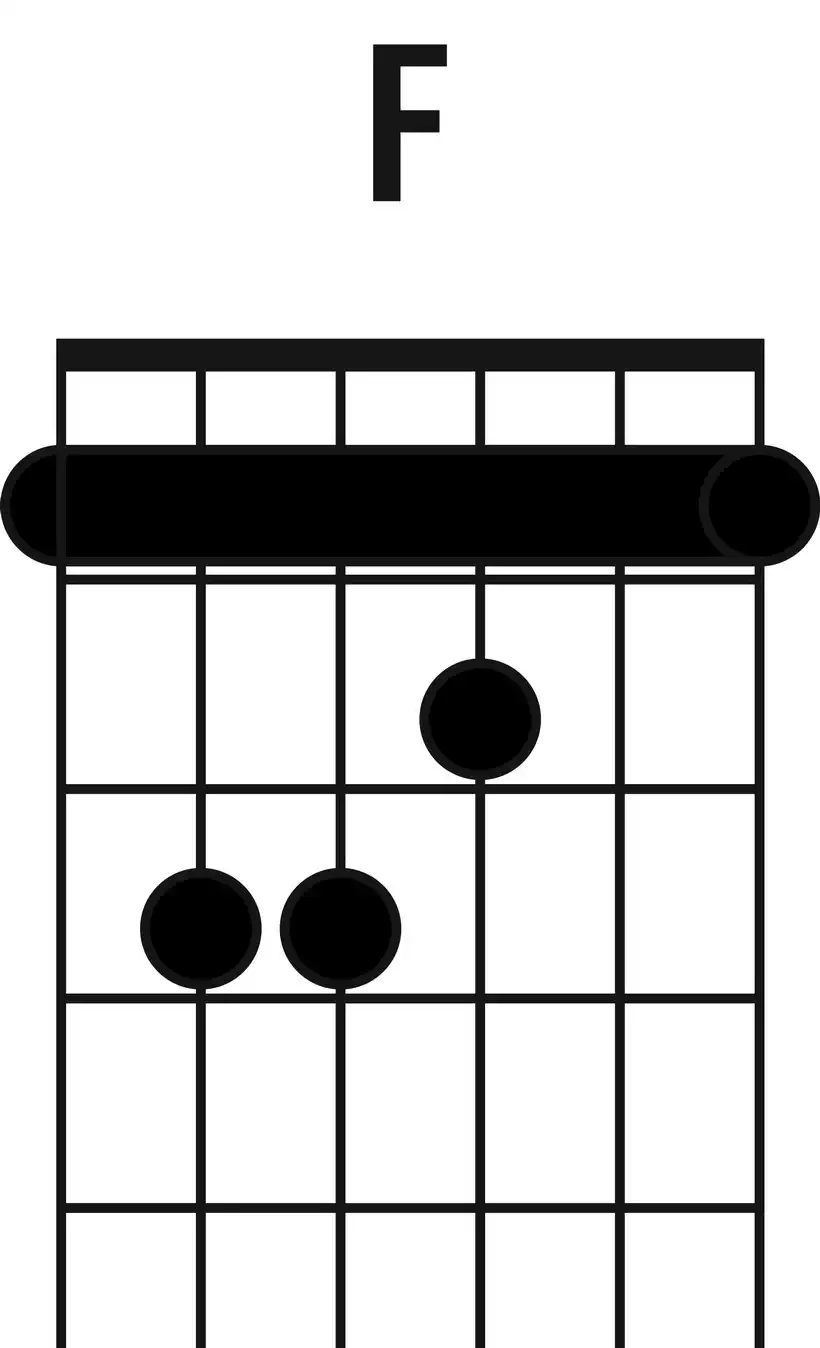
Typically, the first barre chord type you'll learn are "E-shape" barre chords (also called "root 6" barre chords). These chords use your first finger to barre all six strings and then use your middle, ring, and pinky fingers to make the shape of an E major chord.
The root note is the note fretted on the low E string. Here's F major, an E-shape barre chord:
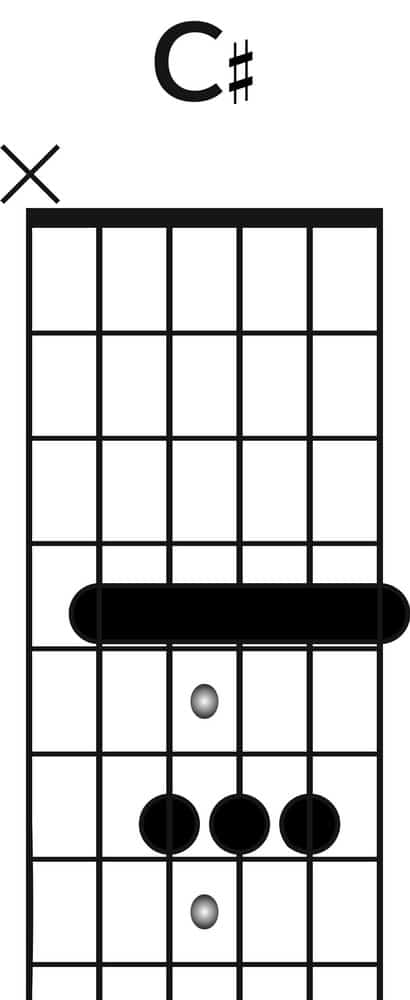
The next type is the barre chord based on the A major chord. These are known as "root 5" chords because the root is on the fifth string. With these chords, you need to mute or just not play the sixth string. Here's C# Major, a root 5 chord:
When playing barre chords, you create minor chords the same way as with the open chord shapes. For example, while playing an F major barre chord, your index finger bars all strings at the first fret. When you lift up your first finger, your middle finger and third fingers create the shape of an E minor chord. Thanks to the bar at the first fret, this is an F minor chord. Similarly, to play minor versions of root 5 chords, you make the shape of an open A minor behind the barre.
On barre chord diagrams, very thick horizontal lines indicate a bar. If the horizontal line extends across only five strings, then you only barre those five. Sometimes, a barre will be represented by a curved line instead.
The chords G, E, and D will also come up as you continue playing guitar. The CAGED system, which uses all five basic shapes, will show you how to use all five shapes up and down the neck.
For a video intro to barre chords, check out this great tutorial!
10. Other Ways To Use Chord Diagrams
Once you know how to read chord diagrams, you'll find that they can help your play guitar in new and interesting ways. If you can, try to have a blank diagram or two lying around. If you like to experiment with different fingering patterns to see what they sound like, you can always mark out something that sounds good.
Then, if you'd like to find out the name of the chord, you can input it to one of the free online "chord finder" tools online. On these tools, you can specify the tuning you're in and enter the fingering. The tool will then tell you what chord you're playing.
We also mentioned chord charts above. Putting one on the wall where you practice can make learning new chords easy. When you have time or just feel inclined to learn something new, try practicing a new chord or two. Plus, since the chart will be right where you practice, you can always just look back at it if you forget how to play a given chord.
Want to Learn More?
If you're learning to play guitar, you might soon find that it can be challenging to decide what to learn next. But an online guitar course can offer a clear learning plan to help you succeed. Whether you want a little help moving from open chords to barre chords or are an experienced player looking to get even better, online courses can get you there.
Many of these sites also include useful tools like guitar chord charts and chord finders, and they also can integrate useful music theory in a fun and meaningful ways.
Final Thoughts
Whether you want to seek out more guitar chord charts or just want to work on chords you've already learned, knowing how to read guitar chord diagrams is an important first step. The more you learn about chords and chord shapes, the more playing guitar starts to make sense.
What do you think? Do you have any tips for reading and using chord diagrams? Let us know in the comments, and please don't forget to like and share if you found it useful!

